The holiday rush is on. Your calendar is full. A last-minute party invitation lands in your inbox. Then, the familiar panic. “I have nothing to wear.”

That feeling is common. But it is often wrong. Your closet holds hidden potential. You just need a new way to see it.
This guide is your solution. We found 50 stylish, fast outfits you can assemble from pieces you likely already own. Forget the mall. Let’s build a great party look right now.
1: The Festive Jeweled Tank

This look is a true holiday savior. The entire outfit hinges on one standout item: a sleeveless top covered in colorful jewels. Reds, greens, and golds glitter against a dark background, creating an instant festive feel.
This statement piece pairs beautifully with simple, tailored black trousers. Most women have a reliable pair of black pants in their closet, which makes this look easy to pull together. The combination is effortless and chic.
Let the top command all the attention. Add only a small black clutch and classic pointed-toe pumps. You are ready for the party in minutes.
DIY: Assembling the Jeweled Tank Look
Step 1: Find Your Foundation Go to your closet and pull out your best-fitting pair of black pants. These could be slim-fit trousers (like in the picture), nice black jeans, or even wide-leg dress pants. The goal is a clean, simple bottom.
Step 2: Hunt for the “Star” Now, look for your most decorated top. This is the “star” of your outfit. It should be sleeveless or have short sleeves. Look for anything with sequins (tiny shiny circles), beads, or a very glittery fabric. A top with holiday colors like red, green, or gold is great, but a black or silver sparkly top also works.
Step 3: Put Them Together Try on the pants and the top. Decide if you should tuck the top into the pants. If the pants are high-waisted, tucking usually looks very polished. If the top is designed to hang loose, you can leave it untucked.
Step 4: Choose Simple Shoes Because your top is so fancy and sparkly, your shoes should be simple. Find a pair of plain black shoes. Pointed-toe heels or nice flat shoes are both good choices. You want the shoes to just blend in.
Step 5: Grab a Small Bag You only need a small purse, often called a “clutch.” A simple black one is best. This lets everyone keep looking at your amazing, festive top.
2: The Cozy Sweater & Pleated Skirt

This outfit masterfully balances comfort and style. A soft, fuzzy sweater in a light color like white or cream feels warm and inviting. It creates a lovely contrast with the sleek, dark green pleated skirt.
The skirt’s texture, which looks like leather, adds a modern edge. Together, these pieces create a look that is both relaxed and dressed up. This is a great choice for a holiday dinner or a casual office party. It’s festive without being overly formal.
DIY: Assembling the Sweater & Skirt Look
Step 1: Grab a Warm Sweater Find a cozy sweater in your closet. A plain, solid color like white, beige, or light gray works best. It can be a pullover (a “crewneck”) or a V-neck.
Step 2: Find a Fancy Skirt Look for a “pleated” skirt. This means it has many folds, like an accordion or a paper fan. A skirt that goes below your knees (a “midi” skirt) is great. A dark color like forest green, black, or navy blue is a good choice.
Step 3: Tuck It In Put on the sweater and skirt. Tuck the front of the sweater just a little bit into the waistband of the skirt. This shows off your waist and makes the outfit look neat.
Step 4: Add Boots or Shoes “Ankle boots” (boots that stop at your ankle) look very stylish with this. Dark brown or black boots are a good match. You can also wear simple flat shoes.
Step 5: Add a Necklace Put on one or two simple gold or silver necklaces to finish the look.
3: The Statement Silver Trousers

This look is all about the pants. Shiny, metallic silver trousers catch every light in the room. They are the ultimate party piece.
Because the pants are so bold, the top should be simple. A chunky, oversized knit sweater in a dark color like charcoal gray adds a comfortable, grounded feel. This contrast between “cozy” and “glam” is very fashionable. Black ankle boots complete the edgy, modern vibe. This outfit shows you are ready for fun.
DIY: Assembling the Silver Trousers Look
Step 1: Find Your Shine This whole outfit is about one thing: shiny pants! Look in your closet for any pants that are metallic. Silver is amazing, but gold, bronze, or even sparkly black pants will work.
Step 2: Get Your Coziest Sweater To balance the shiny pants, you need a very simple, non-shiny top. Find your most comfortable, chunky knit sweater. A dark color like gray or black is a great choice because it lets the pants be the star.
Step 3: Try a “Half-Tuck” Put on the pants and the sweater. Take just the very front bottom edge of the sweater and tuck it into your pants. Let the rest of the sweater hang loose. This looks relaxed and cool.
Step 4: Add Dark Boots Black ankle boots are the best choice here. They match the “cool” vibe of the pants and the dark sweater.
4: The Shimmering Wrap Dress

A wrap dress is a classic shape that looks good on almost everyone. This one gets a holiday update with a shimmering, metallic fabric. The gunmetal or pewter color is sophisticated and festive.
The V-neck and the tie at the waist create a flattering silhouette. A side drape adds a touch of elegance. This is a one-and-done outfit. You just put it on, add a few simple accessories, and you are instantly party-ready.
DIY: Assembling the Wrap Dress Look
Step 1: Find a Wrap Dress Look for a dress that wraps around your body and ties at the side of your waist. It will usually have a V-shaped neckline.
Step 2: Look for Sparkle For a party, a plain dress is fine, but a sparkly one is better! Look for a wrap dress in a glittery fabric. Colors like silver, gold, dark gray, or deep blue are very festive.
Step 3: Put on Simple Shoes The dress is the main attraction. Find simple high-heeled shoes (pumps) in a “nude” color (one that is close to your skin tone) or black. This makes your legs look longer.
Step 4: Add a Small Bag Grab a small, elegant clutch. This is a small purse with no strap that you hold in your hand.
Step 5: Add One Bracelet A single, simple bracelet is all you need. You’re all set.
5: The Luxe Velvet Robe

This is a brave and luxurious last-minute idea. Turn a beautiful velvet robe or kimono into your main outfit. The purple, fringe-trimmed version acts as a short, flirty dress. The long black version, layered over a simple slip, becomes a dramatic, flowing gown.
The key is the rich velvet texture. It feels expensive and very seasonal. A satin sash cinches the waist. This look is comfortable, unique, and very glamorous.
DIY: Assembling the Velvet Robe Look
Step 1: Find Your Base First, you need a simple “slip dress” or a plain black tank top and black leggings. This will go underneath. A black lace-trimmed “camisole” (a type of tank top) is also a great choice.
Step 2: Find Your Robe Look for your fanciest robe. A robe made of velvet or silk is best. A plain black one is very elegant. A rich color like deep purple, dark green, or ruby red is also wonderful.
Step 3: Put it On Put on your base layer first (the slip dress or tank top). Then, put the robe on over it, just like a jacket or coat.
Step 4: Cinch Your Waist Use the robe’s own belt (usually called a “sash”) to tie it closed at your waist. Make a nice, neat bow. This gives you a good shape.
Step 5: Add Fancy Shoes Wear your best high heels with this look. Black or metallic shoes will make it look like a planned, expensive outfit.
6: The Soft Cardigan & Metallic Skirt

This outfit plays with texture. A soft, fuzzy cardigan in a pastel blue adds a touch of warmth and sweetness. The jeweled buttons make it special enough for a party.
This soft top is paired with a sharp, metallic silver pleated skirt. The shiny, accordion-like folds of the skirt create a beautiful contrast to the fuzzy knit. The whole look is unexpected and very modern. Silver pumps tie the metallic shine from the skirt all the way down.
DIY: Assembling the Cardigan & Skirt Look
Step 1: Find a Fancy Cardigan Look for your “nicest” cardigan sweater (the kind that buttons up the front). A soft, fuzzy one is great. One with special buttons, like pearls or fake jewels, is even better. A light color like baby blue, pink, or white is very pretty.
Step 2: Find a Shiny Skirt Now, find a pleated skirt (the one with all the folds). This time, look for one in a shiny metallic color, like silver or gold.
Step 3: Button Up Put on the skirt. Then, put on the cardigan, but button it all the way up. Wear it like a shirt, with no other top underneath (or just a simple tank top that doesn’t show).
Step 4: Tuck It In Tuck the bottom of the buttoned-up cardigan into the waistband of the shiny skirt. This will look very neat and stylish.
Step 5: Match Your Shoes If you have shoes that match the skirt (like silver shoes with a silver skirt), put them on! If not, simple black or nude shoes will also work.
7: The Sheer Top & Velvet Trousers

This look is elegant with a hint of mystery. It starts with a sheer, see-through black blouse. The celestial pattern of moons and stars adds a magical, festive touch.
A simple black bralette or camisole underneath provides coverage. The top is tucked into high-waisted black velvet pants. The soft, deep black of the velvet makes the sheer top stand out even more. This outfit is sophisticated and daring.
DIY: Assembling the Sheer Top Look
Step 1: Find a “See-Through” Top Look for a “sheer” blouse. This is a shirt made of very thin, see-through fabric. A black one is classic. One with a pattern, like dots or stars, is extra fun.
Step 2: Layer Underneath You must wear something under the sheer top. Find a simple black tank top, a “camisole,” or a plain black “bralette” (like a simple sports bra or bikini top). Put this on first.
Step 3: Put the Sheer Top On Put your sheer blouse on over the tank top or bralette.
Step 4: Find Velvet Pants Look for your fanciest black pants. If you have any made of “velvet” (the soft, fuzzy fabric), those are the best choice. If not, use your plain black dress pants from the first outfit.
Step 5: Tuck and Go Tuck the sheer top (and the tank top underneath) into the waistband of the velvet pants. Add your favorite black high heels.
8: The Mod Suede Dress

This outfit has a cool, retro 1960s feel. The main piece is a simple A-line dress in a soft, suede-like fabric. The “A-line” shape means it’s fitted at the top and flares out slightly.
The mock-neck collar adds a touch of class. The earthy brown tone is warm and stylish. Pairing it with black opaque tights and tall, matching brown boots makes it winter-ready. A single, bold turquoise necklace adds a fantastic pop of color.
DIY: Assembling the Suede Dress Look
Step 1: Find a Simple Dress Look for a simple dress with long or 3/4 length sleeves. A “mock-neck” (a small, short collar) is great. A solid, warm color like brown, tan, or dark orange is a good start.
Step 2: Add Warm Tights Since the dress is short, you’ll need “tights.” Find a pair of plain black tights that are not see-through (these are called “opaque”).
Step 3: Add Tall Boots This look needs tall boots that go up to your knees. If you have boots that match the color of your dress (like brown boots with a brown dress), that’s fantastic. If not, black boots will also work.
Step 4: Add a “Pop” of Color The most important part! Find a single, big, and brightly colored necklace. A color like bright blue (“turquoise”), red, or green will stand out against the brown dress and look amazing.
9: The Sporty Ski Suit

This is the most unconventional look, and it’s full of confidence. A sleek, one-piece ski suit or athletic “catsuit” is not just for the slopes. Its body-hugging shape and bold color stripes are energetic and fun.
The look is sporty and futuristic. The half-zip at the top lets you style the neckline. It needs almost no accessories. Paired with a large, furry “trapper” hat, this outfit is playful and guaranteed to be a conversation starter.
DIY: Assembling the Ski Suit Look
Step 1: Find a “One-Piece” This is a tricky one, but so fun! Look for any “one-piece” outfit you have. This could be a “jumpsuit” or “catsuit.” Maybe you have a “unitard” from a costume, or even a very sleek pair of athletic leggings and a matching long-sleeve top.
Step 2: Look for Stripes A solid black one is fine, but one with “racing stripes” down the side is even better.
Step 3: Put it On This is the whole outfit! Just zip it up.
Step 4: Find a Wild Hat The key to making this a “look” is a big, fun, and fuzzy winter hat. A “trapper” hat (with the furry ear flaps) or any big, “faux-fur” (fake fur) hat will make the outfit look playful and complete.
Step 5: Choose Simple Shoes Wear simple black boots or even clean, dark-colored sneakers. The outfit is all about the suit and the hat.
10: The Emerald Velvet Wrap Dress

This is a timeless holiday classic. The long-sleeved wrap dress is already an elegant shape. Making it in a deep, emerald green velvet makes it the ultimate holiday outfit.
The fabric is soft, catches the light beautifully, and has a festive feel. The V-neck and waist tie are flattering. Because the dress is so rich in color and texture, it requires very little else. Simple black tights and pumps are all you need. A delicate gold necklace finishes the look.
DIY: Assembling the Velvet Wrap Dress Look
Step 1: Find a Long-Sleeved Dress Look for a dress with long sleeves. Just like in outfit #4, a “wrap dress” (that ties at the waist) is a great choice.
Step 2: Look for Velvet Check if you have any dresses made of “velvet” (the soft, plush, fuzzy fabric). Velvet in a deep, rich color like emerald green, dark blue, or ruby red is a true holiday winner.
Step 3: Add Tights (Optional) If it’s cold, you might want to wear tights. Simple black tights (either sheer or see-through) are a good, warm choice.
Step 4: Add Simple Shoes Wear a pair of classic black high-heeled “pumps” or nice black flats.
Step 5: Add a Dainty Necklace This dress is so beautiful on its own, you only need one tiny, delicate necklace. A simple gold or silver chain is all it takes.
11: The Ornate Brocade Trousers

This outfit is built around one very sophisticated piece: the pants. The trousers feature a stunning, intricate pattern woven right into the fabric. This “brocade” style looks rich and textured.
A simple, fitted black turtleneck is the only other thing needed. It balances the “busy” pants and keeps the look streamlined. This contrast is very elegant. Simple black pumps complete the outfit. It’s a powerful look for a chic dinner party.
DIY: Assembling the Brocade Trousers Look
Step 1: Find Your Fanciest Pants Look in your closet for your fanciest pair of pants. You are looking for pants with a rich, woven-in pattern. They might look like they are made from “tapestry” or fancy curtain fabric. Gold and black is a great combination.
Step 2: Find a Simple Black Top You need a very plain, tight-fitting black shirt. A “turtleneck” (with the high neck) is the best choice. A simple, long-sleeve black shirt will also work.
Step 3: Tuck It In Put on the pants and the shirt. Tuck the black shirt all the way into the pants. Make sure it is tucked in smoothly.
Step 4: Add Simple Shoes Wear a pair of simple black high-heeled shoes. You want everyone to keep looking at your amazing pants.
12 : The Velvet Bodysuit & Denim Skirt

This look perfectly mixes “fancy” and “casual” fabrics. The top is a rich, navy blue “velvet.” This soft, plush fabric always feels right for a holiday. The wrap-style V-neck is a classic shape.
This fancy top is tucked into a simple black denim skirt. Using a jean skirt for a party is a cool, modern choice. The high-waist and pencil shape keep it looking sleek. This is a great, understated outfit for a more casual party.
DIY: Assembling the Velvet & Denim Look
Step 1: Find a Velvet Top Look for any top made of “velvet” (the soft, fuzzy fabric). A deep, rich color like navy blue, dark red, or black is a good choice. A “bodysuit” (which snaps at the bottom) will stay tucked in nicely.
Step 2: Find a Black Skirt Now, find a simple black skirt. A “pencil skirt” (one that is straight and narrow) works well. If you have one made of denim (jean material), that is an extra-stylish choice.
Step 3: Tuck and Go Put on the skirt and the velvet top. Tuck the top all the way into the skirt’s waistband.
Step 4: Add Classic Shoes Wear a pair of simple black high-heeled shoes (“pumps”).
Step 5: Add Big Earrings Because the outfit is simple, you can wear big, dangly earrings. Silver or gold ones would look great.
13: The Dramatic Black Cape Top

This all-black outfit is comfortable and very dramatic. It starts with simple, wide-leg black pants. These are easy to move in and always look elegant.
The “star” of this look is the top. It is a “poncho” or “cape” style, which means it just drapes over your shoulders. This creates a flowing, powerful shape. The “cowl neck” (a soft, draped neckline) adds to the sophisticated feel. This is a great choice for looking chic while staying very comfortable.
DIY: Assembling the Cape Top Look
Step 1: Find Your Base First, put on an all-black “base.” This means a simple black tank top and your most comfortable pair of wide-leg black pants.
Step 2: Find Your Cape Now, look for the special piece: a black “poncho” or “cape.” This is a piece of fabric that drapes over your shoulders, often with a hole for your head. One with a soft, floppy neckline (a “cowl neck”) is fantastic.
Step 3: Put it On Just put the cape on right over your black tank top and pants.
Step 4: Add Jewelry This look needs big, bold jewelry. Put on some chunky gold or silver bracelets on one or both wrists. Big earrings are a good idea, too.
Step 5: Add Simple Shoes Plain black shoes are all you need to finish it.
14: The Statement Puff-Sleeve Top

This outfit is all about one thing: the sleeves. The shirt is a simple, black fitted top. But the sleeves are enormous “puffy” or “balloon” sleeves made from a shiny fabric.
This huge, dramatic top is paired with a sleek, simple black skirt. The slim skirt makes the giant sleeves look even more purposeful and high-fashion. This is a bold, confident look that makes a big entrance. Keep your hair pulled back to show it off.
DIY: Assembling the Puff-Sleeve Look
Step 1: Find the “Puff” Shirt This outfit needs one very special item. Look in your closet for a shirt with huge puffy sleeves. They might be called “balloon sleeves.” A black shirt is very dramatic.
Step 2: Find a “Slim” Bottom Because the sleeves are so big, your pants or skirt must be simple and slim. Find a black “pencil skirt” or slim-fitting black pants.
Step 3: Put Them Together Put on the skirt or pants. Tuck the puff-sleeve shirt in. This will make the sleeves pop even more.
Step 4: Sleek Hair Pull your hair back. A tight “bun” or a “ponytail” is best. This shows off the shirt’s amazing shape.
Step 5: Simple Shoes Wear simple black shoes. Your shirt is the star.
15: The Sequin Sweatshirt

This is how you do “casual holiday.” The outfit is built around a “sweatshirt” that is completely covered in large, shiny sequins. The warm, rose-gold color is very festive.
This super-sparkly top is dressed down with a pair of regular dark-wash blue jeans. This high-low mix (a very fancy top with very casual pants) is fun and modern. It shows you’re ready to party, but also want to be comfortable.
DIY: Assembling the Sequin Sweatshirt Look
Step 1: Find Your Sparkle Go to your closet and find your sparkliest top. The best one for this look is a “sweatshirt” or a simple, long-sleeve shirt that is covered in “sequins” (the tiny, shiny, coin-like circles).
Step 2: Get Your Jeans Find your favorite, most comfortable pair of blue jeans. A dark blue color usually looks a little bit dressier.
Step 3: Put Them On Put on the jeans and the sparkly sweatshirt. You can leave the sweatshirt untucked.
Step 4: Choose Your Shoes You can wear this with comfortable shoes. Clean white “sneakers” or flat “loafers” look great.
Step 5: Messy Bun Pull your hair up into a “messy bun” to keep the whole look feeling relaxed and fun.
16: The Cozy Knit Set

This outfit is the peak of comfort and style. It is a “matching set,” which means the top and pants are made from the same exact material and color.
The material is a soft, stretchy “ribbed knit” (like a sweater). The top is a long-sleeve turtleneck, and the pants are high-waisted and wide-leg. In a deep holiday color like dark red or teal green, this looks very put-together. It feels like wearing pajamas, but looks very chic.
DIY: Assembling the Knit Set Look
Step 1: Find a Matching Set Look in your closet for a “matching set.” This is a top and pants that were sold together. They must be the same color and same fabric. A “knit” or “sweater” set is best.
Step 2: Choose a Rich Color A set in a deep, rich color like dark red, green, or black will look the most like a party outfit.
Step 3: Put On the Set Put on both matching pieces.
Step 4: Add a Fancy Belt This is the most important step! Find a nice belt, like a black leather belt with a big shiny gold buckle. Put the belt on over your top, right at your waist. This makes it look like a planned, stylish outfit.
Step 5: Add Shoes You can wear “chunky” shoes (with a thick sole) or simple boots with this look.
17: The Classic Tartan Skirt

A “tartan” or “plaid” skirt is a holiday classic. The festive pattern of red and green lines instantly makes you think of winter parties.
This look is timeless and easy. You just pair the plaid skirt with a simple, solid-color top. A fitted black sweater or a cozy white turtleneck are both great choices. For shoes, tall black boots make the outfit feel warm. Black “loafers” make it look classic and preppy.
DIY: Assembling the Tartan Skirt Look
Step 1: Find Your Plaid Look for a skirt that has a “plaid” or “tartan” pattern (the criss-cross lines). A pattern with red and green is the most festive, but any plaid will work.
Step 2: Find a Simple Top You need a plain, solid-color shirt. A black or white “turtleneck” (with the high neck) is a perfect choice. A simple black sweater also works.
Step 3: Tuck It In Put on the skirt and the top. Tuck the top all the way into the skirt’s waistband.
Step 4: Choose Your Shoes You have two great choices here. Choice A: For a warm, wintery look, wear tall black boots that go up to your knees. Choice B: For a classic, “school” look, wear flat black shoes called “loafers.”
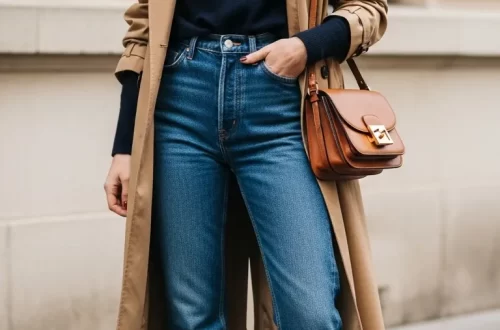
18: The Velvet T-Shirt

This is a simple but very effective outfit. It takes a basic, everyday item—the T-shirt—and makes it special with a festive fabric.
This T-shirt is made from soft, shiny “velvet.” The olive-green color is unique and stylish. By just changing the fabric, the T-shirt becomes party-ready. It pairs easily with dark blue jeans and black ankle boots. This is a great “I-did-not-try-too-hard” look.
DIY: Assembling the Velvet T-Shirt Look
Step 1: Find a “Fancy Fabric” T-Shirt Look in your T-shirt drawer. Find a T-shirt that is made of a fancy fabric. “Velvet” (soft and fuzzy) is the best. “Satin” or “silk” (very shiny and smooth) also works.
Step 2: Get Your Jeans Find a pair of dark blue jeans. “Skinny” jeans (very tight on the leg) work well.
Step 3: Put Them On Put on the jeans and your fancy T-shirt. You can tuck the front of the shirt in a little bit (a “half-tuck”) or leave it out.
Step 4: Add Ankle Boots Wear a pair of black “ankle boots” (boots that stop at your ankle).
Step 5: Add Jewelry You can add a long necklace or some big, chunky bracelets to finish the look.
19: The Silky Matching Set

This two-piece outfit is simple and very elegant. It is a “matching set” made from a very shiny, smooth fabric like “satin” or “silk.” The soft champagne color looks very expensive.
The top is a sleeveless “camisole” with a “cowl neck” (a soft, draped neckline). The skirt is a matching midi-length skirt. When worn together, they look like one beautiful, flowing dress. This is a graceful and understated party look.
DIY: Assembling the Silky Set Look
Step 1: Find a “Silky” Set Look for a matching set (top and bottom sold together) that is made of a very shiny, smooth “satin” or “silk” fabric.
Step 2: Put On Both Pieces Put on the matching top and skirt. They should be the same exact color.
Step 3: Add Necklaces This simple outfit looks great with “layered” necklaces. This means putting on two or three different, thin gold or silver necklaces at the same time.
Step 4: Add Fancy Shoes Wear your fanciest “strappy” sandals or high heels. Shoes in a “nude” color (close to your skin tone) or a metallic color will look best.
20: The Fur-Trimmed Jumpsuit

This outfit is a “one-and-done” show-stopper. It is a “jumpsuit,” which means the top and pants are all one piece. The black velvet fabric is elegant and perfect for a holiday.
What makes it so special are the “faux-fur” (fake fur) “cuffs” on the sleeves. This detail makes the whole outfit look very luxurious. The wrap-style top and wide-leg pants are flattering. You just need one big, sparkly necklace to complete it.
DIY: Assembling the Jumpsuit Look
Step 1: Find a Jumpsuit Look in your closet for a “jumpsuit” (an outfit that is a shirt and pants all in one). A black one is a great, classic choice. A velvet one is even better.
Step 2: Check for “Extras” Does your jumpsuit have any special details, like fuzzy “faux-fur” cuffs or sparkly buttons? If so, great!
Step 3: Add a “Star” Necklace If your jumpsuit is plain, that is fine! Put it on. Now, find your biggest, sparkliest “statement” necklace. Put it on. This will be the “star” of the outfit.
Step 4: Add a Fancy Bag Grab a small, shiny purse. A silver or gold “clutch” (a bag with no strap) is a good choice.
Step 5: Add Shoes Wear your classic black high-heeled shoes.
21: The Pearl-Studded Sweater

This look gives an “edgy” vibe a holiday twist. It starts with a cozy knit sweater, in black or white. The sweater is decorated with “pearls” scattered all over it, giving it a dressed-up, classic feel.
This “pretty” top is paired with tough-looking “coated” black jeans, which look like leather. This mix of soft pearls and edgy pants is very stylish. Chunky black “combat” boots finish the look. It’s great for a casual party.
DIY: Assembling the Pearl Sweater Look
Step 1: Find a “Decorated” Sweater Look for a cozy knit sweater that has things attached to it. “Pearls” are a great choice. A sweater with small “rhinestones” (fake diamonds) or beads also works.
Step 2: Find Your “Tough” Pants Now, find a pair of black “coated” jeans. These are jeans that are painted to look shiny, like leather. If you don’t have those, plain black skinny jeans or “leather-like” leggings will work.
Step 3: Put Them Together Put on the pants and the sweater. You can do a “half-tuck” (tucking in just the front) or leave the sweater all the way out.
Step 4: Add Chunky Boots The best shoes for this look are “combat boots” or any chunky black boots with laces. This completes the “tough but sweet” look.
22: The Ladylike Knit Suit

This is a very classic and polished look. It is a “matching set” of a sleeveless top and a knee-length skirt. Both pieces are made from the same “knit” (sweater) material.
The set also has a matching “cardigan” (a button-up sweater) that goes over the top. This “three-piece” look is very elegant. The soft, sparkly, pale color is modest and refined. A simple string of pearls is all you need.
DIY: Assembling the Knit Suit Look
Step 1: Find a “Suit-Like” Set This look works if you have a matching top and skirt. They must be the same color and fabric. A “knit” (sweater-like) fabric is best.
Step 2: Add a Matching Cardigan Now, look for a “cardigan” (a button-up sweater) that is the exact same color as your top and skirt. This makes it look like a fancy, expensive “suit.”
Step 3: Put It On You can wear just the top and skirt. Or, you can wear the matching cardigan on top, either open or buttoned up.
Step 4: Add Classic Jewelry A “string of pearls” is the best necklace for this classic look. Simple pearl or diamond “stud” earrings (the small kind) are also good.
Step 5: Add Classic Shoes Simple, “modest” high-heeled shoes (“pumps”) in a gray, black, or nude color are the right choice.
23 : The Sequin Jogger Pants

This outfit is the definition of “dressed-up comfort.” It takes “joggers,” which are casual, sporty pants with a drawstring waist, and makes them in a party fabric.
These joggers are completely covered in black “sequins.” This makes them instantly glamorous. You can pair them with a simple, cozy sweater (like in the picture) for a high-low look. Or, wear them with a silk camisole. Black pumps make them look sharp.
DIY: Assembling the Sequin Jogger Look
Step 1: Find Your “Comfy Sparkle” Pants Look for “jogger” pants. These are the comfortable, “sweatpant” style pants that are loose at the top and get tighter at the ankle. Find a pair that is made of a sparkly material, like “sequins.”
Step 2: Choose Your Top (Two Options) Option A (Comfy): Wear a plain, cozy sweater in a light color like white or beige. Tuck the front in. Option B (Dressy): Wear a simple black “silk” or “satin” (shiny, smooth fabric) “camisole” (a thin tank top). Tuck it in.
Step 3: Add Dressy Shoes Even though the pants are “joggers,” you must wear dressy shoes. Put on your classic black high-heeled shoes. This is what makes the outfit look cool.
24: The Stripe Sweater & Satin Skirt

This outfit is all about mixing textures. It starts with a very chunky, oversized “striped” sweater. The thick wool and casual stripes feel very cozy.
This “daytime” sweater is paired with a very “nighttime” skirt. The skirt is a simple “slip skirt” made of a very shiny, smooth “satin” fabric. This contrast between the heavy, matte knit and the light, shiny silk is very fashionable.
DIY: Assembling the Sweater & Slip Skirt Look
Step 1: Find a “Slip Skirt” Look for a “slip skirt.” This is a simple skirt (usually going to your knees or ankles) that is made of a very shiny, smooth “satin” or “silk” fabric. A light color like champagne, silver, or black is great.
Step 2: Find a Chunky Sweater Now, find your thickest, coziest knit sweater. A “striped” one is a fun choice. A plain, solid-color one also works.
Step 3: Put Them Together Put on the skirt. Put on the big sweater over it.
Step 4: Do a “Front-Tuck” Take just the front-bottom edge of the big sweater and tuck it into the skirt’s waistband. This will show off your waist and the skirt’s shiny fabric.
Step 5: Add “Sock Boots” Wear a pair of “sock boots” (ankle boots that are made of tight, stretchy fabric, like a sock). If you don’t have those, plain black ankle boots will work.
25: The Party Pajamas

This is a fun, modern trend. You wear a “pajama set” to the party. The set must be made of a luxurious fabric. A shiny “satin” or deep, rich “velvet” is required.
The white “piping” (the trim on the edges) makes them look classic. You must dress them up. Add a huge, sparkly statement necklace and your best high-heeled shoes. This shows everyone you are wearing them on purpose as a fashion statement.
DIY: Assembling the Party Pajama Look
Step 1: Find Your Fanciest Pajamas Go to your pajama drawer. You are looking for a matching set (top and pants). They must be made of a fancy fabric. “Satin” (shiny and smooth) or “velvet” (soft and fuzzy) are the only choices. (Cotton or flannel will not work!)
Step 2: Put On the Pajamas Put on the matching pajama top and bottoms. Button up the top.
Step 3: Add a Giant Necklace This is the most important step. You must add a huge, sparkly “statement” necklace. This is what makes it look like a party outfit and not a mistake.
Step 4: Add Your Best Shoes You must wear fancy, high-heeled shoes. Black “pumps” are a great choice.
Step 5: Add a Fancy Bag Grab a small, structured purse. A small black handbag or clutch is great.
26: The Red Velvet Blazer

A “blazer” (a suit jacket) is a great way to make any outfit look sharp. A blazer made from red “velvet” is the ultimate holiday power piece.
This outfit is simple: it’s an “all-black” look underneath. A plain black turtleneck and slim black pants are the base. Then, you put the red velvet blazer on top. The blazer is the star. This is a very chic and powerful look for an office party.
DIY: Assembling the Velvet Blazer Look
Step 1: Create an “All-Black” Base First, dress all in black. Put on a simple black shirt (a “turtleneck” is a great choice) and your best pair of slim-fitting black pants.
Step 2: Find Your “Star” Blazer Now, find a “blazer” (a suit jacket). The “star” of this look is a blazer in a holiday fabric. A red “velvet” one is amazing. A velvet blazer in any deep color (like green or blue) or a sparkly “sequin” blazer also works.
Step 3: Put it On Just put the special blazer on over your all-black base. Leave the blazer unbuttoned.
Step 4: Add Simple Shoes Wear simple, flat black shoes like “loafers,” or plain black high heels.
Step 5: Add a Dainty Necklace A few simple, thin gold necklaces are a nice, delicate touch.
27: The Belted Plaid “Shacket”

This look is rugged, festive, and very cool. It starts with a simple black “sweater dress” or a long black sweater.
The main piece is a “shacket,” which is a “shirt-jacket.” This one is a red and black “buffalo plaid” (the big squares). To make it party-ready, you add a wide black belt over the shacket at your waist. This cinches you in and makes the shacket look like a dress. Tall black boots finish the look.
DIY: Assembling the Belted Shacket Look
Step 1: Find Your Base First, put on a simple, all-black base. A short black “sweater dress” is a great choice. A long black sweater with black leggings also works.
Step 2: Find Your “Shacket” Now, find a “shacket” (a shirt-jacket). This is a thick, oversized button-up shirt. A “plaid” one, especially in red and black, is very festive.
Step 3: Put it On and Button It Put the shacket on over your black base. Button it up all the way.
Step 4: Add The Belt This is the key step. Take a wide black belt and put it on over the shacket, at the smallest part of your waist. Cinch it tight. This gives you a great shape.
Step 5: Add Tall Boots Wear your tall, black, “over-the-knee” boots (the ones that go up past your knees). If you don’t have those, any tall black boots will work.
28: The Layered Sequin Skirt

This is a very clever and modest way to wear sequins for a party. The “star” is a long, floor-length “maxi” skirt that is covered in rose-gold sequins.
Instead of a fancy top, this look uses layers. It starts with a plain black “turtleneck.” Then, a simple white T-shirt is layered over the turtleneck. This casual, layered top is then tucked into the very fancy skirt. It’s a very cool, high-fashion mix.
DIY: Assembling the Layered Skirt Look
Step 1: Find Your Sparkle Skirt Look for your sparkliest skirt. A long “maxi” skirt (one that goes to your ankles) covered in “sequins” is a great choice. Any sequin skirt will work.
Step 2: Start the “Base” Layer Put on a plain, tight-fitting black “turtleneck” shirt.
Step 3: Add the “Top” Layer Now, put a plain white T-shirt on over the black turtleneck.
Step 4: Tuck ItAll In Put on your sparkly skirt. Tuck both shirts (the white T-shirt and the black turtleneck) into the waistband of the skirt.
Step 5: Add a Casual Jacket To make it look even cooler, grab your “denim” (jean) jacket to carry with you.
29: The Metallic Top & Skater Skirt

This outfit is fun, flirty, and festive. The top is a long-sleeve “mock-neck” (a small, short collar) shirt. It’s made of a stretchy, metallic silver-and-black striped fabric that glitters.
This sparkly, fitted top is tucked into a simple black “skater skirt.” This is a skirt that is high on your waist and “flares” out. This A-line shape is fun and easy to wear. Black tights and ankle boots complete the look.
DIY: Assembling the Metallic Top Look
Step 1: Find a Sparkly Top Look for a long-sleeve shirt that is sparkly. A metallic, glittery, or “lurex” (shiny thread) top is what you need. A “mock-neck” (small collar) is a great shape.
Step 2: Find a “Flirty” Skirt Find a simple black “skater skirt.” This is a skirt that is tight at the waist and then flares out (like a circle or an “A” shape).
Step 3: Tuck It In Put on the skirt and the sparkly top. Tuck the top all the way into the skirt’s waistband.
Step 4: Add Tights Put on a pair of “sheer” (see-through) black tights.
Step 5: Add Boots Wear a pair of black “ankle boots” (boots that stop at your ankle).
30: The Fair Isle Sweater Dress

This is the ultimate “cozy cabin” holiday look. The main piece is a “sweater dress.” It is a long, thick knit sweater that is long enough to be worn as a dress.
The pattern is a “Fair Isle” print. This is the traditional, festive pattern with snowflakes and geometric shapes you see on winter sweaters. It’s warm, comfortable, and instantly festive. Just pair it with leggings and warm boots.
DIY: Assembling the Sweater Dress Look
Step 1: Find Your Sweater Dress Look for your warmest, thickest “sweater dress.” This is a knit sweater that is very long, like a dress.
Step 2: Look for a “Holiday” Pattern The best kind for this look has a “Fair Isle” pattern. This is the classic winter design, usually around the neck and shoulders, with shapes like snowflakes or diamonds.
Step 3: Add Leggings Put on the sweater dress. Underneath, put on a pair of warm, plain-colored “leggings.” Black or dark gray are good choices.
Step 4: Add Warm Boots This look is all about being cozy. Put on your warmest, most comfortable winter boots. Fur-lined boots are a great choice.
31: The Glittering Duster Cardigan

This outfit turns a simple black base into a statement. It starts with a black tank top and black leggings or skinny jeans.
The magic comes from the “duster.” This is a very long, floor-length cardigan. This one is made of a sheer, “open-knit” (like a net) fabric that is woven with gold glitter. It flows behind you as you walk and catches the light. It’s a very dramatic and comfortable way to dress up.
DIY: Assembling the Duster Look
Step 1: Create an All-Black Base First, put on your simplest black outfit. A plain black tank top and a pair of plain black “leggings” or skinny jeans is the right base.
Step 2: Find Your “Duster” Now, look for a “duster.” This is a very, very long “cardigan” (a sweater that opens in the front). For a party, find one made of a sparkly or “metallic” thread. A “sheer” (see-through) one is also very dramatic.
Step 3: Put it On Just put the duster on over your all-black base. Let it hang open.
Step 4: Add a Long Necklace A long necklace, or two or three layered necklaces, looks great with the long lines of the duster.
Step 5: Add Simple Boots A pair of simple black “ankle boots” or flat shoes is all you need.
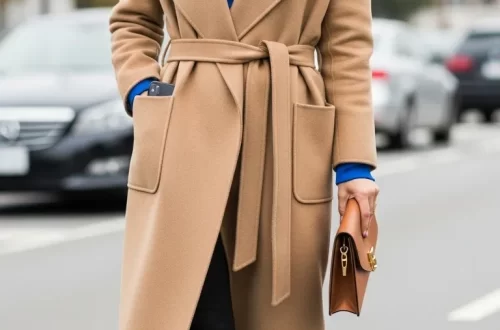
32: The Winter White Trousers

This is a very chic and expensive-looking outfit. It is an “all-white” or “monochromatic” look. It starts with a simple, sleeveless “silk camisole” (a thin tank top) in a cream or white color.
The camisole is tucked into beautiful, high-waisted, wide-leg trousers in a matching shade of white. To make it winter-ready, a big, cozy “teddy” coat (a coat made of fuzzy, fur-like material) in a tan or beige color is worn on top.
DIY: Assembling the Winter White Look
Step 1: Find a White Top Look for a simple, fancy white top. A “silk” or “satin” (shiny, smooth fabric) “camisole” (a thin tank top) is the best choice.
Step 2: Find White Pants Now, find a pair of white dress pants. “Wide-leg” trousers are very stylish. They should be the same shade of white or cream as your top.
Step 3: Tuck It In Put on the pants and the top. Tuck the top all the way into the pants.
Step 4: Add a Cozy Coat Find your warmest, coziest coat. A “teddy” coat (the very fuzzy, soft kind) in a “neutral” color (like tan, beige, or camel) looks amazing.
Step 5: Add “Neutral” Shoes & Bag Wear shoes and carry a purse in the same “neutral” color family. Tan, beige, or cream shoes and a matching bag will complete this expensive-looking outfit.
33: The Fuzzy Cardigan Set & Jeans

This look has a fun, retro 1990s feel. It is a “matching set” of a tiny “crop top” (a short tank top) and a matching “cardigan” (button-up sweater).
Both pieces are made from a very soft, “fuzzy” or “eyelash” knit in a pastel blue color. This “sweet” set is dressed down with a pair of casual, light-wash, “baggy” jeans. This mix of a small, soft top with big, casual pants is very on-trend.
DIY: Assembling the Fuzzy Set Look
Step 1: Find Your “Fuzzy” Top Look for a top made of very “fuzzy” or “eyelash” knit fabric. A soft, pastel color like light blue or pink is great. The best is a “set” with a small tank top and a matching button-up “cardigan.”
Step 2: Get Your “Baggy” Jeans Find a pair of “baggy” jeans. These are jeans that are very loose on your legs. A “light wash” (light blue) color looks best.
Step 3: Put Them Together Put on the jeans. Put on the fuzzy tank top. Then, put on the matching cardigan. You can leave the cardigan open or button just one or two buttons in the middle.
Step 4: Add “Chunky” Shoes Wear a pair of “chunky” sneakers. These are sneakers with a very thick, “platform” sole.
34: The “Burnout” Velvet Dress

This is a very comfortable and “boho” (bohemian) party look. The dress is a simple, “A-line” (flares out) shape with bell sleeves.
The fabric is the special part. It is “burnout” velvet. This means some of the velvet is “burned away” to create a beautiful, semi-sheer pattern. The mix of deep purple, blue, and silver is very rich. This is a one-step outfit. Just put it on.
DIY: Assembling the Burnout Velvet Dress Look
Step 1: Find a Velvet Dress Look for a dress made of “velvet” (the soft, fuzzy fabric).
Step 2: Look for a “Pattern” A plain velvet dress is good, but a “burnout” velvet dress is even better. “Burnout” means some of the fabric is sheer (see-through), creating a beautiful pattern. A “patterned” velvet dress of any kind is great.
Step 3: Add Tights or Leggings Put on a pair of plain black “tights” or “leggings” underneath the dress for warmth.
Step 4: Add Boots A pair of black “suede” (the soft, non-shiny leather) “ankle boots” or tall boots will look best.
Step 5: Add a Long Necklace A single, long necklace (called a “pendant” necklace) matches the “boho” style of the dress.
35: The Statement Fur Stole

This look shows how one accessory can make an outfit. The base is the simplest, most classic item: a fitted, black, “ribbed-knit” (stretchy sweater) “midi” dress (goes below the knees).
The “star” is the accessory. It is a large, dramatic “stole” or “scarf” made of “faux-fur” (fake fur). This one is extra bold with two different patterns: leopard print and bright green. This stole is just draped over the shoulders, and instantly, the simple black dress is glamorous.
DIY: Assembling the Fur Stole Look
Step 1: Find Your “Blank Slate” Dress Find your simplest black dress. A “fitted” (tight) “sweater dress” with long sleeves is the best choice. A plain black long-sleeve shirt and black skirt also works.
Step 2: Find Your “Star” Scarf Look for your biggest, fuzziest, and most dramatic scarf. This is called a “stole” or “boa.” It must be “faux-fur” (fake fur). A plain black one is fine, but a boldly colored or “animal-print” one is the real star.
Step 3: Drape It Put on the black dress. Now, just drape the big, fuzzy scarf over one or both of your shoulders. Don’t wrap it.
Step 4: Add Classic Shoes Wear your classic black high-heeled shoes.
Step 5: Add a Colorful Bag Grab a small “clutch” (small purse) in a bright color, like red or purple, to add one more pop of color.
36: The Classic Tweed Suit

This is a timeless, very “Chanel-inspired” look. It is a “matching suit” made of “tweed.” Tweed is a thick, textured, woven fabric.
This look shows two ways to wear it. One is a short, “frayed” (fuzzy edges) “mini” skirt with a matching jacket. The other is a longer, “pencil” skirt with a matching top. Both are very polished. The pearl buttons make it look extra expensive.
DIY: Assembling the Tweed Suit Look
Step 1: Find Your “Tweed” Look in your closet for anything made of “tweed” (the thick, woven, slightly scratchy fabric). This could be a “blazer” (suit jacket) or a skirt.
Step 2: Try to “Match” It If you have a tweed jacket, try to find a skirt that looks like it matches (even if it’s not a set). A simple black skirt will also work. If you have a tweed skirt, find a jacket or top that matches.
Step 3: Add Pearls This look needs “pearls.” Put on a “pearl” necklace or “pearl” earrings. This is what makes the look so classic.
Step 4: Add Tights Put on a pair of “sheer” (see-through) black tights.
Step 5: Add Classic Shoes Wear your classic, black, high-heeled “pumps.” A black purse is also a good choice.
37: The Full Red Skirt

This outfit is a classic “retro” 1950s silhouette. It is all about the skirt. The skirt is a bright, holiday-red color. It is “high-waisted” and very “full,” with lots of “pleats” (folds).
This huge, dramatic skirt is paired with a very simple, tight-fitting black “turtleneck” sweater. This makes your waist look tiny and lets the skirt be the star. A wide, black “patent-leather” (very shiny) belt makes the waist look even smaller.
DIY: Assembling the Full Skirt Look
Step 1: Find a “Full” Skirt Look for your fullest skirt. This is a skirt with a lot of fabric that “flares” out. A “circle skirt” or “A-line” skirt is great. A bright, solid color like red is very festive.
Step 2: Find a Tight Top You must wear a very simple, tight-fitting top. A black “turtleneck” is the best choice. A tight, long-sleeve black shirt also works.
Step 3: Tuck It In Put on the skirt and the tight top. Tuck the top all the way into the skirt’s waistband. Make it very smooth.
Step 4: Add a Wide Belt Find a wide black belt. A “patent-leather” (very shiny) one is a great choice. Put this belt on over your top, right where the skirt’s waistband is.
Step 5: Add Tights and Heels Wear “sheer” (see-through) black tights and simple black high-heeled shoes.
38: The Red Ribbed-Knit Dress

This is a simple, “one-and-done” outfit that is very flattering. It is a long-sleeved “sweater dress” in a beautiful, deep red color.
The fabric is a “ribbed-knit,” which means it has vertical (up-and-down) stripes in the knit. This makes you look taller and is very stretchy and comfortable. The “mock-neck” (small collar) and “midi” (below the knee) length are very classy.
DIY: Assembling the Ribbed-Knit Dress Look
Step 1: Find a “Sweater Dress” Look for a “sweater dress.” This is a dress made from “knit” (sweater) material. A “ribbed-knit” (with the vertical lines) is very flattering. A solid, deep color like red is a great holiday choice.
Step 2: Put On the Dress This is the whole outfit!
Step 3: Add Tall Boots Wear a pair of tall, black boots. Boots that go up to your knee look great.
Step 4: Add “Layered” Necklaces Put on two or three “layered” gold necklaces of different lengths.
Step 5: Add a “Pop” of Pattern This simple dress looks great with one bold accessory. Grab a “clutch” (small purse) in an “animal-print” like “leopard.” This makes the whole outfit look very stylish.
39: The Deconstructed Shirt Dress

This is a very “high-fashion,” “deconstructed” look. It’s for a very trendy party. It is made by layering two different button-up shirts.
First, a red button-up shirt is put on. Then, a white button-up shirt (that is extra-long, like a “shirt dress”) is layered over the red one. The white shirt is left unbuttoned on the bottom half to show the red shirt. A wide, white belt ties it all together.
DIY: Assembling the Shirt Dress Look
Step 1: Find a Color Shirt First, put on a simple, colored button-up shirt. A bright red one is very festive.
Step 2: Find a White Shirt Dress Now, find a white button-up shirt that is very long, like a “shirt dress.” It must be longer than the red shirt.
Step 3: Layer Them Put the long white shirt on over the red shirt. Button the white shirt from the top down to your waist. Leave the bottom buttons open so the red shirt shows underneath.
Step 4: Add a Wide Belt Find a wide white or black belt. Put this belt on over both shirts, right at your waist.
Step 5: Add Edgy Tights & Boots Wear a pair of “patterned” or “sparkly” black tights. Finish the look with “chunky” black “combat” boots.
40: The Satin Bow-Tie Blouse

This is a very powerful and elegant look. The “star” is the blouse. It is a beautiful, long-sleeve “satin” (shiny, smooth fabric) shirt in a rich, bronze-gold color.
The shirt has a “pussy-bow,” which is a “scarf” attached to the neck that you tie into a big, dramatic bow. This very fancy top is paired with simple, high-waisted, wide-leg black trousers. This is a very sophisticated and “boss” look.
DIY: Assembling the Bow-Tie Blouse Look
Step 1: Find Your “Bow-Tie” Blouse Look for your fanciest blouse. The best one for this look is a “pussy-bow” blouse. This is a shirt that has two long pieces of fabric at the neck, which you tie into a big bow. A “satin” (shiny) fabric in a rich color (like gold, red, or green) is best.
Step 2: Find Wide-Leg Pants Find a pair of high-waisted, wide-leg black dress pants.
Step 3: Put Them Together and Tuck Put on the pants and the blouse. Tuck the blouse all the way into the pants.
Step 4: Tie the Bow Tie the two long pieces of fabric at your neck into a big, floppy bow.
Step 5: Add Simple Shoes & Bag Wear simple black shoes (heels or “platforms”). Grab a small, “structured” (hard-case) “clutch” purse.
41: The Sheer-Sleeve LBD

This outfit is a clever update on the “Little Black Dress” (LBD). The dress itself is a simple, black, “sheath” (straight) shape.
The “holiday” part comes from the sleeves. The sleeves are “sheer” (see-through) and have a “polka-dot” pattern. This adds a touch of fun and elegance without being too flashy. A single, big, sparkly “statement” necklace is all you need to finish it.
DIY: Assembling the Sheer-Sleeve LBD Look
Step 1: Find Your “Special Sleeve” Dress Look for a simple black dress that has special sleeves. The best kind are “sheer” (see-through) sleeves. Sleeves with “polka-dots,” “lace,” or “puffy” sleeves are all great choices.
Step 2: Put On the Dress This is a “one-and-done” outfit, so this part is easy!
Step 3: Add a “Statement” Necklace Because the dress is simple, you need one big, sparkly necklace. This is called a “statement” necklace. It should sit right at your collar.
Step 4: Pull Your Hair Back Pull your hair back into a “bun” or “ponytail.” This looks very elegant and shows off the necklace and the special sleeves.
Step 5: Add Simple Shoes Wear your classic black high-heeled shoes.
42: The Flapper-Style Fringe Dress

This is a really fun, “themed” party look. It’s a “flapper” dress, inspired by the 1920s. The dress is covered in “fringe” (lots of hanging strings) that shakes and moves when you walk or dance.
The “ombre” (color fading) effect, going from black to silver, is very glamorous. This is a “one-and-done” outfit. Just put on the dress. Add a ’20s-style “headband” for extra fun.
DIY: Assembling the Fringe Dress Look
Step 1: Find Your “Fringe” Look in your closet for anything with “fringe” (the long, dangly strings). The best is a “flapper” dress. But a skirt with fringe, or even a “kimono” or “shawl” with fringe, can work.
Step 2: Put On the Dress If you have a fringe dress, just put it on.
Step 3: (If you have a skirt) Add a Top If you have a fringe skirt, put it on. Then, add a simple, plain black or silver “tank top” or “camisole” and tuck it in.
Step 4: Add a Headband To get the full “1920s” look, find a “headband.” A sparkly one with “rhinestones” (fake diamonds) or a feather is the best choice.
Step 5: Add Simple Shoes Wear simple black high-heeled shoes.
43: The Asymmetrical Knit Top

This look is very modern and “architectural.” It is an all-white outfit. The top is a “ribbed-knit” (stretchy sweater) fabric.
What makes it special is the “asymmetrical” (un-even) neckline. It has one long sleeve and one “one-shoulder” strap, leaving the other shoulder bare. This interesting, modern top is tucked into simple, wide-leg white trousers.
DIY: Assembling the Asymmetrical Top Look
Step 1: Find an “Un-Even” Top Look for an “asymmetrical” top. This means a shirt that is not the same on both sides. A “one-shoulder” top (with only one sleeve or strap) is the most common kind.
Step 2: Find Matching Pants Find a pair of pants that are the exact same color as your top. An “all-white” look is very chic. An “all-black” look is also very stylish.
Step 3: Tuck It In Put on the pants and the top. Tuck the top all the way into the pants’ waistband.
Step 4: Add a Shiny Bag Since the outfit is one color, add a metallic accessory. A small, silver or gold “clutch” (small purse) is a great choice.
Step 5: Add Big Earrings Pull your hair back and wear a pair of big, dangly “statement” earrings.
44: The Satin Tie-Front Blouse

This is a great “fancy-casual” look. The “star” is the blouse. It is made of a beautiful, shiny “satin” fabric in a rich, emerald green color. This fabric and color are very festive.
The shirt has a “tie-front,” which means you tie the two front pieces into a knot at your waist. This fancy top is dressed down by pairing it with simple, dark-wash skinny jeans. It’s an easy, comfortable, and polished look.
DIY: Assembling the Satin Blouse Look
Step 1: Find a “Satin” Blouse Look for a blouse (a button-up shirt) made of a shiny “satin” fabric. A rich, “jewel-tone” color (like emerald green, ruby red, or sapphire blue) is very festive.
Step 2: Get Your “Best” Jeans Find your “best” pair of blue jeans. This means a pair in a dark blue color with no rips or holes. “Skinny” jeans (tight on the leg) look great.
Step 3: Put Them On (and “Tie” It) Put on the jeans. Put on the satin blouse. If it’s a “tie-front” shirt, tie the knot at your waist. If it’s a regular button-up, just tuck the front (a “half-tuck”) into your jeans.
Step 4: Add Ankle Boots Wear a pair of black “ankle boots.”
Step 5: Add “Layered” Necklaces A few, thin “layered” gold necklaces look beautiful in the “V” of the shirt’s neckline.
45: The Off-the-Shoulder Sweater Dress

This outfit is simple, cozy, and very alluring. It is a “sweater dress” in a deep, navy blue color. The “ribbed-knit” (vertical lines) fabric is very stretchy and flattering.
The special part is the “off-the-shoulder” neckline. The top of the dress folds down and sits off your shoulders, showing your collarbones. This is a very elegant and timeless look. It’s a “one-and-done” outfit.
DIY: Assembling the Off-the-Shoulder Dress Look
Step 1: Find Your “Off-the-Shoulder” Dress Look for a “sweater dress.” The best kind for this look is an “off-the-shoulder” dress. This is a dress where the neckline is very wide, and you pull it down so it sits off your shoulders.
Step 2: Put On the Dress This is the whole outfit! Pull the neckline down so it is even on both sides.
Step 3: Add a “Choker” (Optional) A “choker” (a necklace that fits tightly right around your neck) looks amazing with this neckline.
Step 4: Add Classic Shoes Wear a pair of simple, classic black high-heeled shoes (“pumps”).
46: The Sequin Crop Top & Blazer

This is a very cool, “edgy” party look. It is built in layers. The base is a pair of “leather-like” leggings or “coated” jeans and a black “blazer” (suit jacket).
The “party” part is the top. Under the blazer, you wear a “cropped” (short) top that is covered in black “sequins.” This adds a flash of sparkle. This look has two shoe options: “combat boots” for a tough look, or “pumps” for a dressier look.
DIY: Assembling the Sequin Crop Top Look
Step 1: Find Your “Leather” Pants Find your “leather-like” pants. These can be “faux-leather” (fake leather) “leggings” or “coated” black jeans (the shiny kind).
Step 2: Find a “Sparkly Crop Top” Look for a “crop top” (a very short shirt). Find one that is sparkly or covered in “sequins.” A black sequin top is very chic.
Step 3: Find Your Blazer Find a simple, classic black “blazer” (a suit jacket).
Step 4: Layer It Up Put on the leather pants and the sparkly crop top. Then, put the black blazer on over the top. Leave the blazer open.
Step 5: Choose Your Shoes Option A (Edgy): Wear black “combat boots” with laces. Option B (Dressy): Wear classic black high-heeled shoes (“pumps”).
47: The Plaid Power Suit

This is a very confident and stylish “power” look. It is a “matching suit” (a blazer and pants) in a “plaid” or “tartan” pattern.
The gray suit with red and yellow lines is very festive. Instead of a shirt, a “lace bralette” or “camisole” is worn underneath. This “masculine” (the suit) and “feminine” (the lace) mix is very modern.
DIY: Assembling the Plaid Suit Look
Step 1: Find a “Plaid Suit” Look for a “matching suit” (a blazer and pants). A “plaid” (criss-cross lines) one is a very bold choice. (If you don’t have a suit, a plaid blazer with plain black pants also works).
Step 2: Find Your “Lace” Top This is the key. Find a fancy “bralette” (like a small, lace bra) or a “lace camisole” (a tank top with lace).
Step 3: Put Them On Put on the suit pants. Put on the lace bralette. Then, put on the suit “blazer” over it. You can button the blazer or leave it open.
Step 4: Add Fancy Shoes Wear your best, fanciest high-heeled shoes.
Step 5: Add a Small Bag Grab a small, simple “clutch” (small purse).
48: The Festive Bow Belt

This look is about one accessory. It shows how to make any “Little Black Dress” (LBD) instantly ready for a holiday party.
The outfit is just a simple, sleeveless black “sheath” (straight) dress. The “star” is the belt. It is a giant, red “plaid” bow on a belt. This one accessory is so big and festive, it changes the entire outfit. A matching red bow in your hair is a fun extra touch.
DIY: Assembling the Bow Belt Look
Step 1: Find Your Simplest Black Dress Go to your closet and find your simplest “Little Black Dress” (LBD). A sleeveless, plain black dress is the best “blank slate.”
Step 2: Find a Festive Belt This is the only thing that matters. Find a “statement belt.” The best one is a belt that has a giant bow on it. A red “plaid” (tartan) one is the most festive. (If you don’t have one, you can buy a big plaid bow from a craft store and pin it to a simple black belt!)
Step 3: Put It On Put on the black dress. Put the giant “bow belt” on, right at your waist.
Step 4: Add a Festive Headband If you have a headband with a matching red bow, put it on.
Step 5: Add Red Lipstick Wear bright “red lipstick” to match the bow.
49: The Minimalist Knit Dress

This is a very “minimalist,” modern, and expensive-looking outfit. It is a “matching set” of a sleeveless “mock-neck” (small collar) top and a long “maxi” skirt.
Both pieces are made from the same, high-quality “knit” (sweater) fabric in a soft, “neutral” (like beige or gray) color. It looks like one long, sleek dress. The “statement” is in the jewelry: a giant, gold “choker” (neck collar) and a matching giant, gold “cuff” (bracelet).
DIY: Assembling the Minimalist Dress Look
Step 1: Find a “Knit Set” Look for a “matching set” of a top and skirt. They must be the same knit (sweater) fabric and the same solid, “neutral” color (like beige, tan, gray, or black). A sleeveless top and a long “maxi” skirt is a great combo.
Step 2: Put On the Set Put on the matching top and skirt. It should look like one, long, simple dress.
Step 3: Add Giant Gold Jewelry This is the key. This simple outfit needs big, bold, simple jewelry. Find a giant, thick, gold “choker” (a necklace that sits high on your neck like a collar). Find a giant, thick, gold “cuff” bracelet.
Step 4: Add a Simple Bag & Shoes Your purse and shoes should match the “neutral” color of your dress.
50: The Color-Block Ball Skirt

This is the ultimate “last-minute” fantasy outfit. It is very high-fashion. The top is just a simple, tight-fitting black “turtleneck” sweater.
The entire outfit is the skirt. It is a “ball skirt,” which means it is huge, high-waisted, and goes to the floor. This one is made of “color-blocked” (big sections of color) “taffeta” (a shiny, stiff fabric) in bright magenta, blue, and green.
DIY: Assembling the Ball Skirt Look
Step 1: Find a Tight Black Top Put on your simplest, tightest-fitting black “turtleneck” shirt. A long-sleeve, tight black shirt also works.
Step 2: Find Your Biggest Skirt Now, go find the biggest, most dramatic skirt you own. This is your “ball skirt.” It should be “high-waisted” and very “full.” A “maxi” (floor-length) skirt is best. A skirt in a bright, bold color or a shiny fabric is the star.
Step 3: Put Them Together Put on the huge skirt. Tuck your tight black top all the way into the skirt’s waistband.
Step 4: Add Tights and Heels Wear black “tights” and simple black high-heeled shoes.
Step 5: Add Big Earrings Pull your hair back and wear a pair of big, sparkly “statement” earrings.
The party season does not have to be stressful. Your wardrobe is not your enemy. It is a resource.
From a simple sweater to a pair of shiny pants, the right combination is waiting. These 50 ideas show that style is about creativity, not just new clothes.
The best outfit is one that makes you feel confident. You have the tools. Go enjoy the party.
H2: Key Takeaways
- Mix Your Textures. Pair something cozy (like a knit sweater) with something fancy (like sequins or satin). This contrast always looks intentional.
- One “Star” is Enough. Let one piece do the work. A jeweled top, a velvet blazer, or a full red skirt needs only simple black items to look complete.
- Rethink Your Basics. A simple black turtleneck, black trousers, or a little black dress can be the base for dozens of party looks.
- Accessories Are Saviors. A statement necklace, a bold belt, or a fuzzy scarf can turn a simple outfit into a festive one.
- Don’t Fear “Casual”. Jeans, T-shirts, and even joggers can be party-ready when paired with sequins, satin, or high heels.