The holiday season means planning for every possible scenario. One minute you’re enjoying a snowy mountain cabin, the next you’re toasting at a black-tie gala. A woman’s holiday wardrobe truly needs to be ready to transition without missing a beat.

Finding outfits that work equally well for family gatherings, busy travel days, or glamorous parties is a necessity. Our goal is to eliminate packing stress and maximize style impact, no matter the location or the temperature outside.
This ultimate guide presents 40 distinct outfits, proving that thoughtful style can meet every single demand the season throws your way. Get ready to discover versatile ensembles that ensure you step out looking confident, stylish, and prepared for anything.
1. The Desert Bloom Tassel Caftan

This gorgeous two-tone caftan defines effortless resort chic. Its split design features an earthy olive green alongside a warm, sandy beige, creating a beautiful visual contrast. Rich, detailed embroidery in shades of fuchsia and gold lines the edges and bell sleeves, adding a wonderful, handcrafted texture.
The silhouette offers a relaxed, flowing shape, excellent for holiday relaxation or elevated loungewear. A thick, tasseled rope belt cinches the waist gently, providing shape and structure to the maxi length. Pair this breathable garment with light, wide-leg trousers for a refined, comfortable ensemble that suits many different destinations. This style promises sophistication whether you are relaxing at a remote retreat or exploring a bustling city square.
DIY Instructions: Styling Your Caftan Look
This look is all about layering and tying a nice knot! Follow these steps to put it all together:
Step 1: Start with the Base
First, find a pair of wide-leg trousers that are light in color, like cream or white. Slip into those first. Make sure they feel comfy because we want this whole outfit to be relaxed.
Step 2: Put on the Caftan
Next, put the long, robe-like caftan on over your pants, just like you would put on a dressing gown. Let the front hang open for now so you can see the pants underneath.
Step 3: Finding Your Waist
Locate the matching rope belt. This belt is long and usually has cool, floppy tassels on the ends. Hold the middle of the belt behind your back.
Step 4: Tie the Knot
Bring the two ends of the belt around to the front, right where your natural waist is (just above your tummy button). Now, tie a simple bow or a square knot, just like tying your shoelaces, but a bit looser so the fabric drapes nicely.
Step 5: Accessorize with Ease
Find some flat, comfortable shoes, maybe slip-on mules or flat sandals. You can also grab a big, simple tote bag made of canvas or straw. This bag is for carrying all your vacation essentials!
Step 6: Fluff the Details
Look at your tassels and give them a gentle shake so they hang straight. Smooth down the collar and adjust the sleeves so the embroidery shows perfectly. You are ready!
2. The Meadow Mix Maxi Dress

Floral prints in rich jewel tones make this dress a must-have for transitional weather. The design features a charming high neck and long, voluminous sleeves, offering great coverage with undeniable style. A beautiful mix of miniature blue and yellow floral patterns creates a layered, tiered effect through the full-length skirt.
This piece balances modesty with modern elegance, making it suitable for both daytime gatherings and evening dinners. The tiered hemline adds a lovely sense of movement when you walk. Accessorizing with delicate gold necklaces layered at the neckline enhances the bohemian aesthetic of the entire ensemble. Pair it with dark ankle boots to anchor the look for a chic, autumn-ready feel.
DIY Instructions: Layering the Maxi Look
Putting this patterned dress together is very simple and only needs a few quick steps!
Step 1: The Main Piece
First, slide the long, patterned dress over your head. Make sure the high collar sits nicely around your neck. Pull the long sleeves down and check that the elastic or cuffs sit comfortably at your wrists.
Step 2: Choose Your Shoes
Find your dark ankle boots. These should be a solid color, like black, to let the colorful dress be the main star. Carefully pull them onto your feet and make sure the zipper or laces are secure.
Step 3: Add the Accessories
Now we add the sparkle! This look needs layered necklaces. Start with the longest, thinnest necklace and put it on. Then, choose a slightly shorter one with a pretty pendant and put that on. Finally, put on the shortest necklace, which should sit close to your throat.
Step 4: Grab Your Bag
Take a dark shoulder bag and swing the strap over your body so the bag rests on your hip. If you don’t have a shoulder bag, a dark clutch or small handbag works well too.
Step 5: The Final Check
Stand in front of a mirror. Give a little twirl to watch the skirt move. Adjust your necklaces so they hang perfectly and are not tangled. You are now ready for any sophisticated outing!
3. The Maritime Cropped Suit

Classic pinstripes and tailored lines bring a polished, nautical feel to this power suit. The double-breasted jacket features bold, gold-toned buttons that truly pop against the gray and white fabric. Strong, defined shoulders give the blazer a sharp and commanding shape.
Matching cropped trousers finish the look, ending just above the ankle with a crisp folded cuff. This length provides a fresh, modern twist on traditional suiting. A small silk scarf tied neatly at the neck softens the structured tailoring. Wear this confident ensemble to professional events or styled separately for smart casual weekend wear.
DIY Instructions: Mastering the Suiting Look
Creating this sharp, tailored style is easier than you think. Let’s make sure everything is clean and crisp!
Step 1: Base Layer
Put on a simple plain top in a light color, like white or cream. This will go underneath your jacket.
Step 2: Trousers First
Slide into the cropped striped trousers. Make sure the cuffs are neatly rolled up or folded exactly where you want them, just above your ankle. The neatness of the cuff is very important for this look.
Step 3: The Jacket
Carefully put on the matching striped blazer. Button the jacket up. Pay attention to those gold buttons; they should line up straight down the middle.
Step 4: The Neck Scarf
Take a small, square silk scarf. Fold it in half to make a triangle, then roll it up lengthwise until it looks like a long, thin tube. Wrap this tube around your neck and tie a neat little knot, letting the ends hang down the front slightly.
Step 5: Accessorize with Heels
Step into a pair of pointy black high heels. These shoes help make your legs look long because the trousers are cropped.
Step 6: Sunglasses Check
Hold a pair of light-framed sunglasses in your hand. You are carrying these, not wearing them, as a cool accessory. Smooth down the jacket and ensure your scarf knot is secure. Excellent job!
4. The Artisan Denim Utility Skirt

This outfit shows off a fantastic mix of hard-working style and effortless comfort. The central piece is a long, dark denim maxi skirt with large patch pockets. Bold white contrast stitching highlights the seams and pockets, giving it a strong, utility-inspired appearance.
A unique crisscross belt harness secures the skirt and adds an interesting detail to the back. Paired with a simple soft gray sweater, the look feels instantly cozy and grounded. This highly practical yet chic ensemble is wonderful for busy days that require both mobility and style. The leather cuff and belt detailing provide a rich, earthy contrast to the dark denim.
DIY Instructions: Assembling the Utility Skirt
This style focuses on careful layering and securing a special strap detail.
Step 1: The Top
Put on your long-sleeved gray sweater. Pull the sleeves down and smooth out any wrinkles. This sweater should be simple and very soft.
Step 2: The Skirt
Step into the long denim skirt. Zip it up and button it closed. Now, look at the two straps attached to the back of the skirt.
Step 3: Crisscross the Straps
Take one strap and bring it up over your shoulder, like a backpack strap. Take the other strap and bring it up over the other shoulder. The straps should cross in the back to form an “X” shape. Fasten the straps to the front of the skirt using the buckles or buttons there.
Step 4: Tie the Back Bow
Find the extra long piece of fabric hanging down from the back waistband of the skirt. You need to tie a neat, pretty bow with this fabric, right in the center of your lower back. This cinches the waist and looks decorative.
Step 5: Final Touches
Put on a wide leather wrist cuff on one wrist. Put on simple, comfortable shoes, like flat sandals or sneakers. Now you have a stylish and comfortable outfit that has lots of useful pockets!
5. The Chunky Knit Sweater Dress Ensemble

Embrace comfort without sacrificing glamour in this cozy holiday look. The main item is a beautiful, thick cream-colored sweater dress featuring a deep V-neck and voluminous balloon sleeves. Ribbed detailing adds texture to the chunky knit.
The relaxed shape is expertly tailored with a thin, decorative gold chain belt worn high on the waist. This small addition provides subtle definition and elevates the whole outfit. Pair the dress with dark, sleek leggings that feature striking gold knee detailing. Finish the look with knee-high leather boots for a rich, textured, and warm winter style.
DIY Instructions: Styling the Cozy Sweater Dress
This look is about adding shape and color details to a big, soft sweater.
Step 1: The Foundation
Put on the dark leggings. These leggings are special because they have a cool, bold circle detail near the knees, so make sure those details are facing forward and sitting correctly.
Step 2: The Dress
Next, put the chunky sweater dress on over the leggings. The hem of the dress should sit high on your thighs, covering your bottom nicely. Smooth the sleeves and ensure the V-neck is sitting straight.
Step 3: Cinch the Waist
Take your gold chain belt. Wrap it once around the outside of the sweater dress at your natural waistline. Secure the belt. It should be worn gently so it just hints at your waist without pulling the fabric too tightly.
Step 4: The Boots
Sit down and carefully pull on your tall leather boots. The top of the boots should reach just below your knee. Stand up and smooth the leggings under the boots.
Step 5: Final Accessories
Find a warm, fluffy item to wear around your neck, like a faux fur collar or a simple, cozy scarf. Grab a structured small leather handbag. You’ve turned a simple sweater into a chic holiday statement!
6. The Aubergine Draped Column Gown

This stunning full-length aubergine gown is ready for any formal occasion. The rich, deep purple color commands attention immediately. The silhouette features a high turtleneck and dramatic, asymmetrical draping across the bodice and waist.
Soft, luxurious fabric flows down to the floor, creating an elegant column shape. The strategic ruching across the midsection flatters the figure beautifully. Subtle details like the wrist ruching on the long sleeves add textural interest. Finish this sophisticated style with bold, sculptural gold earrings and metallic sandals for maximum impact.
DIY Instructions: Wearing a Dramatic Gown
Getting this luxurious look right is all about smoothing the fabric and letting the drapes fall perfectly.
Step 1: The Dress
Step into the long purple dress and pull it up carefully. This dress has a turtleneck, so make sure you pull the neck part over your head smoothly.
Step 2: Smoothing the Drapes
Look at your middle section. The fabric is twisted and gathered there on purpose. Use your hands to gently smooth the fabric so the gathers and drapes look neat and intentional, falling toward your hip.
Step 3: The Head Wrap (Optional)
If you are wearing a matching head wrap, gently wrap the fabric around your head, tucking in the ends neatly at the back or side. This gives a very powerful, royal look.
Step 4: Jewelry Time
Put on large, bold gold earrings. These should be long and noticeable, as they frame your face.
Step 5: Shoes and Split
Step into your metallic high heels or sandals. The dress has a slight slit or opening near the bottom; check that the split is falling naturally as you walk. Take slow, elegant steps!
7. The Contrast Asymmetry Shirt Dress

This inventive shirt dress takes classic tailoring and spins it into a modern art piece. The design features a bold contrast of solid black and crisp white halves. A vibrant mustard yellow vertical panel runs down the front, secured by striking large, spherical buttons.
It cleverly combines formal elements—like a stiff collar and sharp French cuffs—with a playful, deconstructed skirt. The hemline is sharply asymmetrical, with the black fabric dropping into a cascading ruffle and dramatic angular point. This look is truly unique, ensuring you stand out at any cocktail gathering or formal business lunch. Pair it with black pointed pumps and a structured handbag.
DIY Instructions: Rocking the Asymmetrical Look
This style is about sharp lines and bold contrasts. Let’s focus on the unique elements.
Step 1: The Main Piece
Put on the black, white, and yellow shirt dress. Button the front carefully, ensuring the yellow strip and the buttons are straight down the middle.
Step 2: Cuffs First
Pull the long sleeves down. You need to fold or cuff the bottom of the sleeves neatly. If you have cuff links (small metal decorations), put them through the holes to keep the cuff folds sharp and looking formal.
Step 3: The Hemline
Walk in a circle and watch the bottom of the dress. The black side is longer and flowy. The white side is shorter. Make sure the long, flowing part hangs freely and is not caught between your legs.
Step 4: Accessories
Step into your black high-heeled shoes. These should be very pointy and shiny. Now, take a small, structured black handbag and hold it in one hand.
Step 5: Earrings
Put on a pair of simple but modern large, geometric earrings. They should match the sharp, angular look of the dress. Stand tall and confident!
8. The Quilted Alpine Utility Set

Prepare for maximum warmth and comfort with this rugged, yet chic quilted matching set. The set includes a cozy bomber jacket and comfortable, straight-leg trousers, both featuring a distinct diamond stitch pattern. A cool, earthy olive green hue defines the jacket, which is trimmed with crisp white piping around the edges and pockets.
These garments are built for exploring, yet they maintain a minimalist aesthetic that travels well. The outfit is grounded with sturdy hiking boots featuring bright, colorful laces, suggesting adventure awaits. A simple rib-knit beanie and a spacious backpack complete this highly practical, outdoor-ready winter ensemble.
DIY Instructions: Dressing for Winter Adventure
This warm look is all about layering for comfort and making sure your gear is ready for a trip.
Step 1: The Base Layer
Put on a simple, lightweight base layer top (like a plain t-shirt or thin sweater) underneath. You won’t see it, but it helps keep you warm.
Step 2: The Trousers
Pull on the quilted gray trousers. Adjust the elastic waistband so it sits comfortably. Look for the white line going down the outside seam of each leg—it should be straight.
Step 3: The Jacket
Put on the quilted bomber jacket. Zip it up halfway or leave it open, depending on how warm you feel. Make sure the collar is flat.
Step 4: The Boots
Put on your hiking boots. A fun part of this look is the laces, so make sure they are tied securely in a double knot so they won’t come undone while walking.
Step 5: The Extras
Pull on the rib-knit hat so it covers your ears. Finally, put the large olive backpack on your back, making sure both straps are comfortable. You look ready for a hike or a walk in the snow!
9. The Digital Camo Skirt and Top Set

This exciting two-piece set blends athletic function with high-fashion flair. Both the cropped top and the flowing maxi skirt feature a bold, abstract pattern of black, electric blue, and lime green, resembling a digital camouflage print. The top is long-sleeved and cropped high on the torso.
The gray pencil skirt is fitted and features a unique, sharp high-low hemline that flows over matching leggings. This creates dynamic movement and adds extra coverage. The look is grounded with sleek black athletic shoes and accessorized with futuristic wraparound sunglasses. This ensemble is designed for movement, making it fabulous for travel, city exploration, or fashion-forward workouts.
DIY Instructions: Putting Together the Travel Set
This unique look combines many layers, so follow these steps carefully to get the proportions right.
Step 1: The Tights and Base
First, put on a simple pair of dark leggings or tights. These should be long and comfortable.
Step 2: The Skirt
Pull on the dark gray maxi skirt on over the leggings. The skirt has a special high-low hem (shorter in the front, longer in the back), so ensure the point is facing forward and sitting straight.
Step 3: The Top
Put on the matching cropped long-sleeve top. It should sit perfectly right above the skirt’s waistband, showing a small strip of your tummy or the top of the skirt.
Step 4: Shoes and Bag
Slide your feet into the chunky black athletic sneakers. Next, fasten the light gray fanny pack (or belt bag) around your waist and adjust the strap so it sits across your chest or shoulder.
Step 5: The Shade
Put on the oversized, dark, futuristic sunglasses. They cover a lot of your face and complete the sporty, high-tech vibe. You are now styled for speed!
10. The Cozy Sherpa Jumpsuit

For ultimate lounging comfort, look no further than this wonderfully soft sherpa fleece jumpsuit. The rich terracotta color is warm and inviting, truly capturing the cozy feeling of the holidays. This one-piece outfit zips up the front and features a roomy hood for extra warmth.
The fleece material has a delightful texture, ensuring a snug feel from head to toe. Large patch pockets provide a casual, practical element. This style is certainly not for going out but is the undisputed champion of comfortable holiday mornings, movie nights, or relaxing fireside afternoons. Pair this jumpsuit with thick socks and soft moccasin slippers for the full relaxation effect.
DIY Instructions: Achieving Maximum Cozy
This is the easiest look to put together! It’s all about warmth and softness.
Step 1: The Jumpsuit
Step into the one-piece fuzzy jumpsuit. Pull it up over your shoulders. Reach for the long zipper at the front and pull it all the way up to your neck or chest, depending on how warm you want to be.
Step 2: The Hood
The jumpsuit has a hood. You can leave the hood down flat on your back, or if you feel a chill, pull the hood over your head to feel extra snuggly.
Step 3: The Footwear
Put on a pair of thick, fuzzy socks. They should be tall and warm. Now, slip your feet into the soft leather moccasin slippers.
Step 4: The Accessories (For Decoration)
This outfit is about staying inside, so your accessories are decorative! Find a chunky knitted scarf and a striped beanie hat. You can drape the scarf over your arm and put the hat on a hook nearby.
Step 5: Ready to Relax
Tuck your hands into the large front pockets of the jumpsuit. Go find the coziest spot in your house, grab a mug of hot cocoa, and enjoy the holiday break!
11. The Electric Trail Layer

Outdoor enthusiasts will appreciate the high-performance design of this ensemble. The vibrant lime green jacket instantly provides visibility and a youthful energy. Its technical fabric and strategic mesh panels are built for ventilation and fast-paced activity.
Paired with structured black utility shorts, the contrast is both visually striking and practical. The shorts feature useful cargo pockets and mesh details, enhancing the sporty, ready-for-anything feel. This dynamic combination is an excellent choice for a hiking excursion or any adventurous holiday activity. Complete the look with sturdy trail shoes and a baseball cap for sun protection.
DIY Instructions: Building the High-Energy Hiking Outfit
This look needs careful layering and preparation for being active outside.
Step 1: The Inner Layer
Start by putting on a simple, dark t-shirt or thin long-sleeve top. This is your base layer that touches your skin.
Step 2: The Shorts
Pull on the black utility shorts. Fasten the button and zipper. Make sure your pockets are empty so they are ready to hold small gear like a phone or map.
Step 3: The Jacket
Now, put on the bright green jacket. Pull the zipper up all the way to your chin. The hood is essential for rain, so make sure it is unrolled and ready on your back.
Step 4: Footwear
Put on your hiking socks and lace up your sturdy hiking shoes. Tie the laces in a secure double knot so they will not trip you.
Step 5: Final Touches
Put the baseball cap on your head with the bill facing forward. If you have a trekking pole, grab it. You are geared up and ready to hit the trail!
12. The Safari Puffer Ensemble

This outfit is excellent for cooler weather exploration, offering both warmth and freedom of movement. The mustard yellow quilted vest provides a pop of cheerful color against the neutral base. Its hooded design and visible orange zippers add functional, energetic details.
The foundation of the look is a pair of tailored khaki cargo trousers. These pants offer a sophisticated take on utilitarian style, with clean lines and practical side pockets. Worn over a sleek black long-sleeve top, the ensemble feels instantly balanced. This highly functional layering is ready for anything from wildlife viewing to a brisk walk in the park.
DIY Instructions: Layering the Utility Vest Look
This style uses different layers, so we need to put them on in the correct order to keep you warm.
Step 1: The Slim Base
Put on the simple black long-sleeve top . Make sure the sleeves are pulled down and the shirt is tucked smoothly into the top of your pants.
Step 2: The Trousers
Pull on the khaki cargo trousers. Button and zip them up. The pants should feel comfortable but not too baggy. Smooth out the fabric on the legs.
Step 3: The Vest
Now, put on the yellow puffer vest. Zip it all the way up to your neck. The hood should hang neatly on your back. The vest is sleeveless so your arms are free to move.
Step 4: Footwear and Hat
Put on sturdy gray walking shoes. Lace them tightly. Finally, grab the wide-brimmed sun hat and keep it ready to put on your head when you step outside.
13. The Midnight Floral Corset Gown

A striking choice for any highly sophisticated holiday celebration, this look is intensely romantic and dramatic. The focal point is a voluminous midi ball skirt featuring a dark floral print in muted mauve and black. Its structured shape is emphasized by a whimsical, delicate fur trim along the hemline.
The skirt is paired with a sleek black satin corset bodice. The corset features long sleeves and a peplum detail that flares out over the skirt’s waistband, providing an elegant separation. Lace-up detailing down the back gives the piece a classic, vintage structure. This commanding look ensures you make an unforgettable entrance.
DIY Instructions: Getting Dressed in a Formal Gown
This outfit has many steps because it is very formal. You might need a helper for the back!
Step 1: The Skirt
Step into the big, floral skirt. Pull it up to your natural waist. The skirt is meant to be full and fluffy, so let the fabric puff out.
Step 2: The Corset Top
Carefully put on the black corset top with the long sleeves. Make sure the sleeves are smooth. The open section with the strings should be at your back.
Step 3: The Lacing (Ask for Help!)
Ask your helper to pull the corset lacing tight and tie a strong, neat bow at the center of your back. This makes the top fit perfectly and gives you a very elegant waist shape.
Step 4: Shoes
Put on your tall black high heels or boots. These should be sleek and simple.
Step 5: Final Adjustments
Smooth down the skirt and make sure the little fur trim at the bottom is neat. Stand up straight, and you will look like a queen!
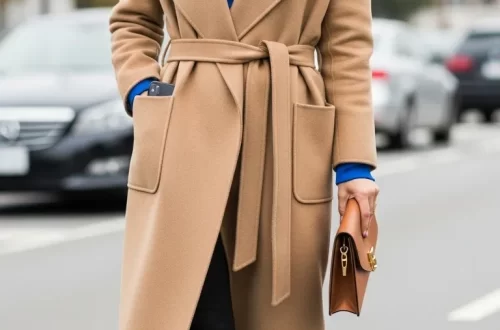
14. The Tailored Cocoa Comfort

This ensemble shows off how professional tailoring can feel incredibly cozy. A soft camel-colored sweater provides a rich, warm tone. The sweater is slightly cropped and features a simple round neck, making it easy to wear. Look closely at the cuffs, which have delicate white and brown stitching detail.
The sweater is paired beautifully with high-waisted, wide-leg gray trousers. The pants have sharp pleats down the front, giving them a formal structure and a long, lengthening line. The textured wool of the trousers provides a smart contrast to the soft knit of the top. Finish the look with simple black loafers and a unique bucket bag.
DIY Instructions: Putting Together the Sharp Trousers Look
This style is about keeping the clothes tidy and the lines very straight.
Step 1: The Top
Put on the camel-colored sweater. The sweater is not meant to be tucked in tightly, but it should sit neatly just over the waistband of your pants.
Step 2: The Trousers
Pull on the gray pleated trousers. Fasten the button and zipper. Look down at the front of your legs. You should see a very neat, straight fold or crease going down the middle of each pant leg. This crease is important!
Step 3: Shoes and Bag
Slide your feet into simple black leather loafers. Now, take the structured bucket bag. It has two colors—cream and brown—so make sure the handle is positioned nicely.
Step 4: Wrist Check
Look at the sleeves of your sweater. Gently roll or push the sleeve up slightly so that the special little patterned cuff detail shows clearly near your wrist. This is a nice detail!
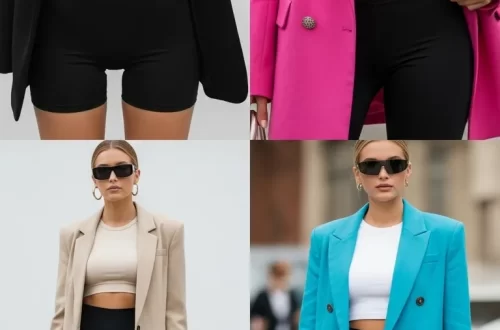
15. The City Cyclist Blazer

Blending formal and athletic wear, this street-style outfit is daring and current. The oversized gray herringbone blazer dominates the look, offering structure and a masculine edge. The blazer is worn loosely over a monochromatic, all-black athletic base.
The essential base consists of a black crop top and tight, knee-length biker shorts. This juxtaposition of tailored wool and sleek spandex is what makes the style modern. Chunky white sneakers and high white socks provide an athletic finish. This look is truly versatile, functioning well for running errands or grabbing coffee while looking incredibly fashionable.
DIY Instructions: Mixing Formal and Sporty Pieces
This look is about combining things you would wear to work with things you would wear to the gym!
Step 1: The Base Layer
Put on the black crop top and the black biker shorts. The shorts should fit snugly and reach just above your knees.
Step 2: The Socks
Pull on your white ankle socks. The top of the sock should come up above the top of your sneakers.
Step 3: The Shoes
Put on the chunky white sneakers. Lace them up and ensure they are tied neatly.
Step 4: The Blazer
Put on the big gray blazer. Do not button it up. Just let it hang open over your black base. It should feel much too big for you—that is the whole point!
Step 5: Accessories
Put on a simple gold necklace. Hold a large brown tote bag over your arm. You can also put on your glasses. You have mastered the mix!
16. The Abstract Canvas Trousers

Express your creative side with these outrageously colorful abstract print trousers. The fabric is splashed with bright yellow, shocking pink, and electric blue, all grounded by black details. The trousers feature a tailored, high-waisted fit with a clean line that tapers toward the ankle.
To balance the visual loudness, the trousers are styled with a simple black turtleneck top. This dark, simple top allows the bright colors on the bottom to truly shine. This highly imaginative outfit is excellent for gallery visits, creative workplaces, or any holiday event where you want to celebrate color. Finish the look with black ankle boots and a small shoulder bag.
DIY Instructions: Highlighting the Bright Trousers
The secret to this look is keeping everything else very simple so the pants can be the main star.
Step 1: The Top
Put on your simple black turtleneck. Make sure the neck is pulled up smoothly and is not folded down.
Step 2: The Trousers
Pull on the very colorful trousers. Zip and button them up. They should sit high on your waist. Adjust the black top so it stays tucked in neatly all around the waistband.
Step 3: The Shoes
Put on plain black ankle boots. These boots should cover the bottom of your trousers just slightly.
Step 4: The Bag
Take a small, square black handbag with a shoulder strap. Put the strap over your shoulder.
Step 5: Take a Bow
Stand in front of the mirror. Look at how the bright colors pop against the simple black top. This style is bold and fun, so remember to wear it with confidence!
17. The Starlight Tulle Skirt

This magical, festive look features a voluminous tiered tulle skirt. The skirt is sheer black and deep red, creating a rich color depth. Delicate silver and white embroidery, shaped like moons and stars, decorates the top layer, giving it a cosmic, celestial theme.
The full, flowing midi length makes the skirt feel playful and celebratory. It is styled with a simple cream-colored turtleneck sweater, which provides an anchor and a cozy texture contrast. This outfit is wonderful for holiday parties or elegant evening events that call for a touch of whimsy. Tiny pearl accessories add delicate sparkle.
DIY Instructions: Putting on the Starry Skirt
This delicate skirt needs to be handled gently so the layers stay fluffy and neat.
Step 1: The Top
Put on the plain cream turtleneck sweater. Make sure it is tucked in smoothly at the waist. We want a very clean line here.
Step 2: The Skirt
Step into the big, layered tulle skirt. Pull it up over your waist. The waistband is wide and black, so it should sit right over where the sweater is tucked in. Give the tulle a gentle shake so the layers puff out.
Step 3: The Shoes
Put on delicate, light-colored heels. They might have a little strap that goes around your ankle. Carefully buckle the strap.
Step 4: The Clutch and Jewelry
Take the tiny, sparkly clutch bag and hold it in one hand. Put on small, elegant pearl earrings.
Step 5: The Twirl Test
Turn around slowly. The layers of the skirt should float out nicely, showing off the stars and moons. Do not sit on the skirt in a way that will crush the tulle!
18. The Elevated Traveler Hoodie Set

Embrace luxurious relaxation with this monochromatic hoodie and jogger set. Made from a high-quality knit, perhaps cashmere or wool, the matching pieces come in a soothing neutral taupe color. The hoodie features a structured shape with a simple drawstring and deep kangaroo pockets.
The matching joggers have a tailored fit with neat seam details down the front of the leg. Elastic cuffs at the ankle keep the look clean and sharp. This look is truly the definition of polished comfort, making it a staple for long travel days or upscale weekend breaks. Simple gold hoop earrings and white sneakers complete this effortlessly chic aesthetic.
DIY Instructions: Styling the Knit Loungewear
This cozy look is all about wearing the pieces exactly as they are—simple and coordinated!
Step 1: The Bottoms
Put on the gray knitted joggers. Pull the drawstring at the waist to make them fit snugly, and tie it in a bow. Make sure the ribbed cuff sits nicely at your ankle.
Step 2: The Top
Pull the matching knitted hoodie over your head. Pull the sleeves down and check the ribbed cuff at the wrist. Let the bottom of the hoodie hang loose over your joggers.
Step 3: Shoes and Bag
Put on your clean, white leather sneakers. Lace them up firmly. Now, grab the large taupe duffel bag and hold it in your hand. This is where you put all your travel items!
Step 4: Jewelry
Put on simple round gold hoop earrings. Since the clothes are so simple, the earrings add a little shine. You are ready for a comfortable, stylish trip.
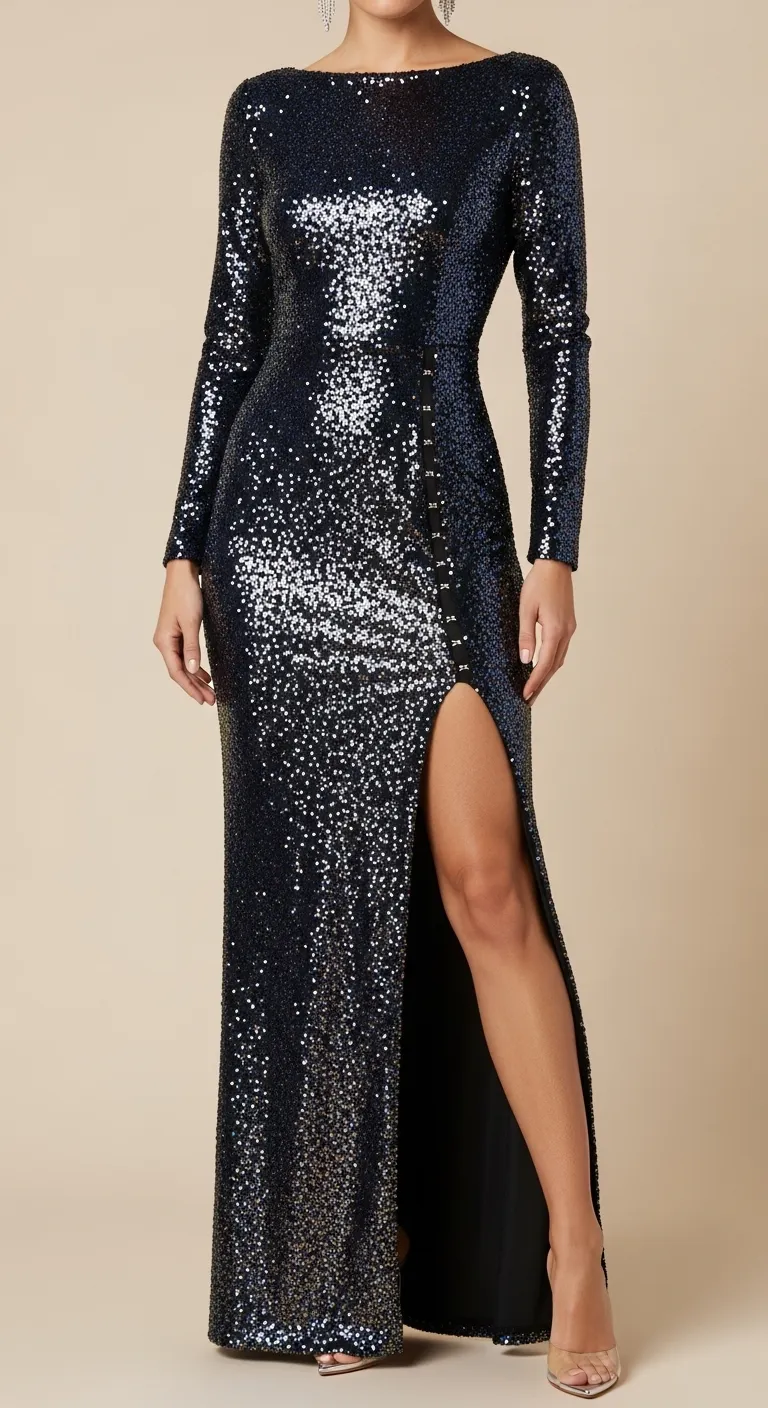
19. The Midnight Glitter Gown

This breathtaking sequined gown captures the magic of a starlit night. Thousands of tiny, dark blue and black sequins cover the dress completely, creating incredible texture and shine. The long sleeves and high boat neck give the piece an elegant, covered silhouette.
The sophistication of the top half contrasts sharply with the drama of the lower half. A very high side slit runs up the leg, allowing for easy movement and a flash of skin. This stunning garment requires minimal accessories and is built for black-tie events, New Year’s Eve parties, or formal holiday galas. Simple clear high heels let the dress be the absolute star.
DIY Instructions: Wearing the Sequin Gown
This dress is shiny and delicate, so we must be very careful when putting it on!
Step 1: The Dress
Step into the long sequin gown. Pull it up gently, taking care not to snag the sequins. Carefully pull the long sleeves onto your arms.
Step 2: The Slit
Stand straight. Find the long cut (the slit) that goes up the side of your leg. You must remember to keep the two sides of the slit in place as you move so they do not get caught on anything.
Step 3: The Shoes
Put on your simple clear or metallic high heels. These shoes are almost invisible and let the dress shine even more.
Step 4: Minimal Accessories
The dress is very shiny, so you need very simple accessories. Put on small silver earrings. You do not need a necklace.
Step 5: Walk Slowly
Practice walking slowly and elegantly. Remember to keep your leg line straight as you step to look confident and poised.
20. The Pastel Velour Relaxation Set

Experience nostalgic comfort with this coordinated velour tracksuit. The soft, pale lilac color feels modern and soothing. The set includes a cropped hooded jacket with a front zipper and matching wide-leg trousers with an adjustable drawstring waist.
Velour fabric is known for its plush texture, making this an excellent choice for cozy indoor activities. The wide-leg cut of the pants offers a relaxed, flowing shape, adding an updated touch to the classic tracksuit. This outfit confirms that you can be completely comfortable without ever looking sloppy. Finish the style with simple white slide sandals or slippers.
DIY Instructions: Getting Snug in Velour
This is another simple look that prioritizes feeling soft and comfortable.
Step 1: The Bottoms
Pull on the wide-leg velour trousers. The legs are very loose and flowing. Pull the drawstring at the waist and tie it in a simple knot so the pants stay up easily.
Step 2: The Top
Put on the cropped velour hoodie. Zip it up all the way. It is shorter than a normal hoodie, so it will show a tiny bit of your tummy or the top of your pants.
Step 3: The Slides
Slip your feet into simple white flat slide sandals. They should be easy to walk in, like house slippers.
Step 4: The Glasses
Hold a pair of sunglasses or reading glasses in your hand, ready to use them.
Step 5: Cozy Check
Check the fabric—it should feel fuzzy and soft everywhere. You are set for a relaxing day of lounging!
21. The Sun-Drenched Sheer Kaftan

This flowing golden kaftan provides glamour and ease for warm-weather holidays. The lightweight, sheer fabric shimmers with fine gold threads, catching the light beautifully beside the pool or ocean. Its deep V-neck features intricate border detailing, drawing the eye upwards.
The silhouette is loose and dramatic, with wide butterfly sleeves and high side splits that allow for cooling air flow. This piece is meant to be worn over swimwear, making it an easy and fashionable poolside cover-up. Colorful stacked bangles and large earrings add a vibrant touch of resort luxury.
DIY Instructions: Styling the Effortless Beach Look
This look is about quick glamour for going to and from the water.
Step 1: The Base Layer
First, put on your bright-colored swimsuit (like the yellow one shown). This is the only thing worn underneath the kaftan.
Step 2: The Kaftan
Slip the long, sheer gold kaftan over your head. Let the wide sleeves hang loose. Make sure the deep neckline is centered on your chest.
Step 3: The Splits
The kaftan has two long splits on the side. Gently hold the fabric to ensure the splits fall nicely and show off your legs as you walk.
Step 4: Stack the Jewelry
Take several bangles or bracelets in different colors and stack them high on one wrist. Put on some long, dangling earrings.
Step 5: Shade and Shoes
Put on some simple flat sandals or flip-flops. Grab a big sun hat and your sunglasses. You are ready for the beach club!
22. The Hot Pink Alpine Jumpsuit

This outfit is built for performance on the slopes while delivering maximum style impact. The one-piece ski suit features a highly visible, vibrant hot pink color, ensuring you stand out against the snow. It has a high neck, a full zip closure, and a structured black belt for a defined waistline.
Practical elements abound, including zipped pockets on the chest and sleeves, ready for ski passes and small essentials. The suit includes black reinforced patches on the knees and lower legs for durability. Paired with large mirrored ski goggles and bright blue gloves, this look combines safety and undeniable, energetic confidence.
DIY Instructions: Gearing up for the Ski Slope
Putting on ski gear is different from regular clothes! We need to make sure everything is sealed up tight for warmth.
Step 1: Inner Warmth
Put on your warm base layers first (long johns and a warm top). Then, step into the pink ski jumpsuit. Pull the zipper up all the way to your chin.
Step 2: The Belt
Fasten the black waist belt over the jumpsuit. Pull it tight enough so the suit fits nicely around your middle.
Step 3: Boots
Put on your ski boots (the hard plastic ones). Make sure they are buckled tightly so your ankles are safe.
Step 4: Gloves and Goggles
Slide the bright blue gloves onto your hands. Put the large mirrored ski goggles on top of your head or on the bridge of your nose. The goggles protect your eyes from the bright snow and sun.
Step 5: Safety Check
Check that all the zipper pockets are closed. If you have a safety device (like the orange one shown), clip it securely to the outside of your suit. You are ready to safely hit the cold mountain!
23. The Wide-Leg Mechanic Jumpsuit

Utilitarian fashion is taken to a sleek, modern level with this dark navy jumpsuit. The design features a smart collar, long sleeves, and practical, oversized cargo pockets on the chest and thighs. A strong metallic zipper runs down the front for easy dressing.
The silhouette is structured at the top, but the trousers fall into an incredibly fashionable wide-leg cut. A sturdy black webbing belt with a large silver buckle cinches the waist, giving the tough, mechanic-style fabric a feminine shape. This versatile one-piece is easy to dress up with statement jewelry or keep minimal for a sharp, practical daytime look.
DIY Instructions: Mastering the Monochromatic Jumpsuit
Wearing a one-piece outfit like this is fast, but we need to pay attention to the details.
Step 1: Put it On
Step into the dark navy jumpsuit. Pull your arms through the sleeves. Pull the long front zipper up to your neck.
Step 2: The Belt
Take the long black belt and thread it through the loops around your waist. Fasten the large silver buckle. Adjust the belt so it sits flat and gives your middle a defined shape.
Step 3: The Pockets
This jumpsuit has many pockets! Make sure the flaps on all the chest and cargo pockets are lying flat and closed neatly.
Step 4: Shoes and Jewelry
Put on chunky black shoes with thick soles. Put a wide silver bracelet on one wrist. This silver detail is a sharp contrast to the dark fabric.
Step 5: The Bag
Grab a small, simple black shoulder bag. You have achieved a powerful, practical style.
24. The Tartan Day Dress

Celebrate the season with this classic, sophisticated tartan midi dress. The rich plaid pattern, woven in deep shades of navy, green, red, and yellow, feels immediately festive and traditional. The dress features a high mock neck and charming, slightly puffed short sleeves.
The silhouette offers a tailored fit through the bodice and a flattering full, flared skirt. A slender dark velvet ribbon defines the waist elegantly. This is a wonderful, refined choice for daytime holiday functions, church services, or family gatherings. Pair it with simple black heels or tall boots for a polished, cozy finish.
DIY Instructions: Achieving a Refined Tartan Look
This look is about simplicity and showcasing the beautiful fabric pattern.
Step 1: The Dress
Step into the plaid dress and pull it up over your head. Make sure the high neckline lies flat against your neck.
Step 2: The Skirt
The skirt is full. Give the skirt a little shake so the fabric flares out naturally. You can put your hands in the pockets to give it a relaxed shape.
Step 3: The Belt
Check the thin velvet ribbon around the waist. Make sure it is straight and not twisted. If it needs adjusting, gently smooth it out.
Step 4: Shoes and Bag
Put on simple black high heels. They should have a pointed toe to look elegant. Take a structured brown leather shoulder bag and put the strap over your shoulder.
Step 5: Final Check
Look over the plaid pattern. Make sure the colors look bright and cheerful. The outfit is now ready for a festive day event!
25. The Arctic Puffer Skirt

This outfit combines extreme warmth with an energetic, modern color palette. The centerpiece is a brightly colored royal blue puffer skirt. Quilted panels provide excellent insulation while maintaining a voluminous, flared A-line shape.
This unexpected winter piece is grounded by a simple black ribbed turtleneck sweater. The sharp black provides a clean, dark backdrop for the vivid color. Bright traffic-cone orange accessories—a chunky beanie and fingerless gloves—add a high-energy pop of contrast. This fun, warm look is great for cold weather sightseeing or après-ski activities.
DIY Instructions: Coordinating Bright Colors
This look requires layering a fitted top with a big, warm skirt, then adding bright details.
Step 1: The Base Top
Put on the black ribbed turtleneck sweater. Make sure the neck is pulled up high and lies flat.
Step 2: The Skirt
Step into the big, puffy blue skirt. Pull it up to your natural waist. The waistband features a special logo-printed belt, so make sure this belt is straight and fastened.
Step 3: The Orange Pop
Put on the chunky orange beanie hat so it covers your forehead and ears. Slide the long orange gloves onto your hands and up your arms.
Step 4: Boots
Put on your warm winter boots (like the black and white ones shown). They should be chunky and waterproof.
Step 5: The Contrast Check
Look at how bright the blue and orange colors look next to the simple black sweater. You are warm, visible, and totally in style!
26. The Mod Contrast Mini Dress

A lively, youthful spirit defines this mini dress. The color blocking is bold, pairing a vibrant emerald green bodice with eye-catching, voluminous burnt orange sleeves. The design is playfully retro, featuring a small, crisp white Peter Pan collar.
The sleeves are a dramatic feature, gathered tightly at the cuff with adjustable tie details. The A-line shape of the short skirt keeps the focus on the striking color combination. This fun, high-energy look is an excellent style for a festive lunch or a birthday celebration. Finish the outfit with tall, smooth white boots for a true 1960s twist.
DIY Instructions: Styling the Playful Mini Dress
This look is all about keeping the lines simple and the colors clean.
Step 1: The Dress
Pull the green and orange mini dress over your head. Smooth down the skirt so it lies flat. Check that the small white collar is neat and visible.
Step 2: The Sleeves
The sleeves are big! Pull the orange sleeves down and look for the strings at the wrist. Gently pull the strings to gather the fabric until you like the shape, then tie them in a neat little bow.
Step 3: The Boots
Sit down and carefully pull on the tall white boots. They should reach up to your knee. Stand up and make sure the hem of your dress falls nicely above the boots.
Step 4: The Clutch
Grab a small clutch bag in the same bright orange color as the sleeves. Hold it simply in your hand.
Step 5: Earrings
Put on some large bright orange earrings. This makes the color theme very clear and fun! You are ready to go with a very cheerful look.
27. The Liquid Metal Pleated Skirt

This opulent ensemble centers around a striking bronze pleated maxi skirt. The metallic fabric has a liquid sheen, with knife pleats creating dramatic texture and movement. The long length ensures an elegant, sophisticated drape.
The skirt is styled simply with a tight black sleeveless top, which acts as a clean, dark foundation. This contrast ensures the attention remains fully on the reflective texture of the lower half. Bold, wide gold cuff bracelets worn high on the wrists enhance the metallic theme. This glamorous, high-shine outfit is absolutely destined for New Year’s Eve parties or formal holiday dinner events.
DIY Instructions: Achieving the Statement Skirt Look
This formal look is easy to put on, but needs very careful accessory placement.
Step 1: The Base Top
Put on the simple black sleeveless top. It should be very fitted and tucked into the waistband of your skirt tightly.
Step 2: The Skirt
Step into the long metallic skirt. Pull it up high on your waist. Look at the pleats—they should hang perfectly straight from top to bottom. If any pleats are folded or crushed, smooth them gently.
Step 3: The Shoes
Put on simple gold metallic high heels or flat sandals.
Step 4: Stack the Cuffs
This is the most important step! Put several wide, chunky gold cuff bracelets on both wrists. Stack them high up your arms. These accessories should be very shiny and bold.
Step 5: The Clutch
Hold a small brown quilted clutch bag in your hand. The gold jewelry and metallic skirt now create a powerful, shimmering effect!
28. The Fireside Artisan Cloak

Wrapped in warm, earthy colors, this flowing oversized wool cloak is the definition of luxurious comfort. The garment features an asymmetrical color block design in rust orange and soft mauve. Striking turquoise and orange tribal-inspired embroidery details the edges and dramatic collar.
The cloak drapes beautifully, offering great warmth without sacrificing style. A unique decorative pin fastens the front, replacing the need for buttons. This statement piece is styled simply over an orange maxi dress. Finish the look with layers of silver jewelry and embroidered slippers for an ensemble that feels both bohemian and richly textured.
DIY Instructions: Putting on the Dramatic Cloak
This style is about wrapping and hanging the fabric so it drapes nicely around your body.
Step 1: The Inner Layer
Put on a simple long dress or tunic in a warm color, like the orange one shown.
Step 2: The Cloak
Drape the large woolen cloak over your shoulders. Make sure the large collar lies flat and the embroidered patterns are straight down the front.
Step 3: The Pin
The cloak is held closed by a decorative pin. Gently push the large decorative pin through the two sides of the fabric where they meet on your chest. This pin is important to keep the cloak closed.
Step 4: The Jewelry
This look needs lots of bracelets and necklaces. Put on several silver bracelets on both arms, stacking them high. Put on two or three long silver necklaces that sit nicely on top of the cloak’s collar.
Step 5: The Shoes and Bag
Slip your feet into flat, soft embroidered slippers. Hold a suede tassel bag in your hand. You are now wrapped in luxury!
29. The Regal Cape Dress

This extremely polished and refined style is truly fit for a state dinner or a formal reception. The midi-length sheath dress features a high neckline and a beautifully tailored, conservative silhouette. The dark color—either deep teal or navy—is elegant and traditional.
The defining feature is the matching attached capelet that falls delicately over the shoulders and arms. This structural detail eliminates the need for a jacket, adding a sophisticated, regal finish. Long, matching evening gloves and sparkling brooches elevate the conservative lines. This is the definition of reserved, timeless power dressing for formal events.
DIY Instructions: Mastering the Structured Cape Look
This elegant look requires precision and smoothing the fabric to keep it looking formal.
Step 1: The Dress
Step into the long, straight dress. Pull the zipper up the back. Make sure the high neckline is neat. The small, separate cape is attached to the shoulders.
Step 2: Smoothing the Cape
Use your hands to smooth the fabric of the small capelet. It should sit very neatly across your shoulders and look symmetrical.
Step 3: The Brooch
Take a sparkling brooch (a piece of jewelry with a pin) and fasten it securely to the fabric of the capelet near your neck. This adds the necessary formal sparkle.
Step 4: The Gloves
Carefully pull on the long matching gloves. They should reach high up your arm. Smooth out any wrinkles in the gloves so they look sleek.
Step 5: Shoes
Put on simple, shiny black high heels. Remember to stand tall and keep your hands folded neatly in front of you.
30. The Tokyo Cloud Kimono Dress

This vibrant look features a unique kimono-style wrap dress. The design uses a bold, asymmetrical block of color, splitting the garment into a rich magenta and a warm mustard yellow. The fabric is decorated with a beautiful Japanese-inspired print of graphic clouds in black and white.
The traditional kimono silhouette features wide, dramatic sleeves and a flattering wrap front. A thin red belt cinches the waist, creating a beautiful focal point and contrast. This incredibly eye-catching garment is truly versatile, suitable for high-end parties or creative, sophisticated daytime outings. Simple gold accessories and a small black clutch complete this culturally rich ensemble.
DIY Instructions: Wrapping the Kimono Dress
This style is all about how you wrap the fabric and tie the belt!
Step 1: The Dress
Put the kimono dress on, but don’t close it yet. The dress will hang open down the front.
Step 2: The Wrap
Take the right side of the dress and pull it tightly across your body. Now, take the left side and wrap it over the right side, pulling the whole dress tight so it fits your shape. The wide neckline should look like a V-shape.
Step 3: The Belt
Take the thin red belt and wrap it around your waist, right where the two sides of the dress overlap. Tie a strong, neat bow with the red belt, or tuck the ends in.
Step 4: Sleeves
Hold your arms out and admire the wide, flowing sleeves. Give them a gentle shake so the fabric drapes nicely.
Step 5: Accessories
Put on a simple chunky gold necklace and grab the small black clutch bag. Put on simple flat shoes or sandals. Great job on the wrapping!
31. The Cyberpunk Moto Mini

This bold look takes rock and roll energy and mixes it with modern street style. The garment is a bright green vinyl mini dress that zips up the front and features moto-style lapels. Strategic cutouts at the waist and a sleeveless design add a fresh, edgy shape.
Shiny black combat boots reaching up to the knee ground the high-energy ensemble. A studded black fanny pack, worn across the waist, provides both attitude and function. This high-impact, daring style is a statement maker, absolutely ready for a holiday concert or a night out.
DIY Instructions: Assembling the Edgy Look
This style is all about zippers and buckles—we need to make sure everything is straight and secure.
Step 1: The Dress
Step into the vinyl mini dress. Pull the front zipper all the way up. Make sure the collar lays flat.
Step 2: The Boots
Sit down and pull on the tall black lace-up boots. Lace them up tightly all the way to the top and tie a secure knot.
Step 3: The Fanny Pack
Take the studded black fanny pack. Buckle the strap around your waist and pull it tight so the bag sits securely right in the middle of your stomach.
Step 4: The Jewelry
Put on a chunky silver chain necklace that sits close to your neck. This adds the finishing touch to your tough, cool style.
Step 5: Check the Zippers
Look in the mirror and make sure all the zippers on the dress and bag are straight and smooth. You’re ready to show off your rebellious spirit!
32. The Roaring Twenties Flapper Dress

Step back in time with this dazzling art deco cocktail dress. The intricate beading features bold geometric patterns in black, red, and nude tones. Tiny sequins cover the surface, creating a beautiful, subtle shimmer.
The dress silhouette is short and straight, characteristic of the 1920s. The hemline finishes with playful, delicate feather trim, which adds wonderful movement when you walk or dance. Accessorize with a beaded headband across the forehead and a simple, small clutch. This glamorous piece is the quintessential choice for a New Year’s Eve party or a vintage-themed gala.
DIY Instructions: Putting on a Fragile Dress
This sparkly dress is delicate, so we need to put it on gently to protect the beads and feathers.
Step 1: The Dress
Hold the beaded dress carefully and slip it over your head. Pull it down gently, ensuring the beads do not catch on anything. The dress should hang loosely and reach just above your knee.
Step 2: The Feathers
Look at the feathers at the bottom of the dress. Use your fingers to fluff them up gently so they look full and bouncy.
Step 3: The Shoes
Put on metallic, strappy high heels. These shoes should be elegant and simple.
Step 4: The Headband
Take the decorative beaded headband. Slide it gently over your head so it sits across your forehead, just above your eyebrows.
Step 5: The Accessories
Hold a tiny beaded handbag in one hand. Put on a bracelet made of white beads or pearls. Now, give a little wiggle to make the feathers and sequins move!
33. The Resort Linen Cropped Set

Perfect for hot weather holidays, this matching linen set feels instantly breezy and effortless. It consists of a high-waisted maxi skirt and a cropped square-neck top, shown in rich terracotta and earthy green. The skirt features deep side splits trimmed with charming white fringe detailing.
The top, whether sleeveless or with a thicker strap, exposes a flattering sliver of midriff. The natural, breathable linen fabric is absolutely comfortable for warm days exploring markets or relaxing by the water. Straw accessories, like a woven hat and macrame shoulder bag, enhance the rustic, vacation-ready feel.
DIY Instructions: Styling the Summer Linen Look
This easy style is about putting on simple, light pieces and adding natural accessories.
Step 1: The Skirt
Pull on the long linen skirt. The waistband has elastic, so pull it up until it sits comfortably at your natural waist.
Step 2: The Top
Pull on the matching cropped top. It should sit neatly above the skirt’s waistband, showing a small area of your skin.
Step 3: The Splits
Look at the long slits on the side of the skirt. Make sure the white fringe details are hanging freely and are not twisted.
Step 4: The Shoes
Put on simple flat leather sandals or flip-flops.
Step 5: Accessories
Put on a wide-brimmed straw hat. Take the woven straw bag and place the strap over your shoulder. You are dressed for sunshine!
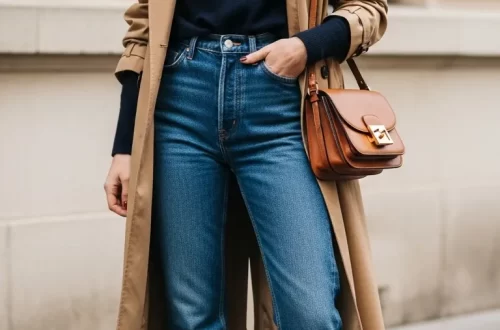
34. The Primary Color Block Sweater

This cozy, oversized color-block sweater provides a playful, contemporary twist on cold-weather knitwear. The bold pattern uses primary colors—yellow, red, and royal blue—against a creamy white background. Its chunky knit and relaxed fit make it warm and highly comfortable.
Styled with simple high-waisted dark denim, the sweater remains the focus of the outfit. The simple, straight-leg jeans and black leather belt act as a neutral foundation, keeping the look grounded. This is a wonderfully expressive choice for a casual holiday event, coffee shop visit, or comfortable travel day. Finish with chunky lace-up boots.
DIY Instructions: Wearing the Oversized Knit
This comfortable look is very easy to put on, but we need to pay attention to the cuffs and neckline.
Step 1: The Bottoms
Pull on your dark denim jeans. Fasten the black belt around your waist. The belt should be tight enough to hold your jeans up but not too tight.
Step 2: The Sweater
Pull the big, colorful sweater over your head. It should feel loose and baggy—that is correct!
Step 3: The Cuffs
The sleeves are long. Gently roll or fold the bottom of the sleeves back once or twice so your hands are free and the ribbed cuffs look neat.
Step 4: The Boots
Put on the chunky black lace-up boots. Lace them tightly and tie a strong knot.
Step 5: Balance Check
Look in the mirror. You have a very colorful, big top and very simple, dark bottoms. This is how the look should be balanced!
35. The Silken Slip Dress

Sleek, sophisticated, and undeniably elegant, this midi-length slip dress is a must-have for evening events. The fabric is a smooth, high-shine satin, draped beautifully with a cowl neckline. This creates a soft, feminine fold at the chest.
Available in rich shades like deep red and silvery grey, the dress skims the body without clinging, providing an effortless silhouette. Delicate spaghetti straps support the fluid shape. This piece truly exemplifies quiet luxury. Pair this beautiful dress with delicate strappy heels and a small, structured handbag for a romantic, refined look.
DIY Instructions: Putting on the Satin Dress
This delicate, shiny fabric needs careful handling to avoid wrinkles and snags.
Step 1: The Dress
Step into the satin slip dress from the bottom and pull it up slowly. The fabric is smooth, so it should slide easily over your body.
Step 2: The Neckline
Look at the front of the dress. The fabric should form a soft, relaxed drape or curve (the cowl neck). Use your fingers to gently position this drape so it looks natural.
Step 3: The Straps
Adjust the two tiny shoulder straps. They should be comfortable and keep the dress in place.
Step 4: The Shoes
Put on your strappy high heels. Carefully buckle the straps around your ankles.
Step 5: The Bag
Hold a small, simple clutch or shoulder bag in your hand. This bag should be dark and not too big, letting the dress be the star. Look closely and make sure there are no wrinkles on the smooth satin fabric.
36. The Feather Trim Halter Top

Bring dramatic, theatrical flair to your party wardrobe with this playful cropped top. It is entirely covered in soft, voluminous feathers in either electric pink or emerald green. The texture is truly unique, creating a wonderfully festive, fluffy appearance.
The top features a high halter neckline, balancing the fun texture with an elegant structure. Paired simply with high-waisted black tailored trousers, the outfit is focused entirely on the vibrant texture of the top. This bold style choice is absolutely perfect for a celebratory toast or a festive night out with friends. Metallic high heels and a sparkly clutch finish the exciting ensemble.
DIY Instructions: Wearing a Fluffy Statement Top
This top is tricky because we need to make sure the feathers look great!
Step 1: The Bottoms
Pull on the black tailored trousers. Zip and button them up. Make sure they fit smoothly over your legs.
Step 2: The Top
Carefully put on the feather top. The strap goes around your neck (a halter). Fasten it securely at the back of your neck.
Step 3: Fluff the Feathers
Look at the feathers. Use your hands to gently fluff them up so the top looks big and round and fluffy. Do not pull or crush the feathers.
Step 4: The Shoes
Put on shiny metallic high heels. These shoes should make your legs look long.
Step 5: The Clutch and Earrings
Hold a small, sparkly box clutch bag in one hand. Put on simple, long dangling earrings. Now, remember to move gently so the feathers stay fluffy!
37. The Velvet Dinner Suit

Elevate classic tailoring into evening wear with this luxurious velvet suit. The deep navy blue color and soft velvet fabric make it feel instantly rich and warm for winter events. The jacket features sharp black satin lapels that contrast beautifully with the matte velvet texture.
The trousers are slim-fitting and tailored to match the sophisticated lines of the blazer. Alternate versions include a jacket covered in a subtle, glistening black and blue sequin pattern, adding festive glamour. This sophisticated choice is a commanding alternative to a dress for any formal dinner or theater event. Pair it with pointed heels and a metallic clutch.
DIY Instructions: Dressing in a Formal Suit
A formal suit needs to look crisp and well-fitted, even if it’s made of soft velvet.
Step 1: The Base Layer
Put on a simple black top (like a camisole or thin shirt). This goes under the jacket.
Step 2: The Trousers
Pull on the velvet trousers. The trousers should fit smoothly down your legs, with no wrinkles.
Step 3: The Jacket
Put on the velvet blazer. Leave it unbuttoned to show the black satin lapels and your inner top. Pull the sleeves down and check the fit on your shoulders.
Step 4: The Shoes
Step into sparkly high heels. These shoes add necessary glamour and sparkle to the dark suit.
Step 5: Accessories
Hold a small sparkly clutch bag in your hand. Put on a simple necklace and earrings. You look powerful and elegant!
38. The Goth Glam Pleated Mini

Embrace a darker, rebellious holiday aesthetic with this high-contrast, edgy look. The centerpiece is a black patent leather mini skirt, sharply pleated and featuring bold metal details like buckles and safety pins. The shiny texture of the vinyl is dramatic and attention-grabbing.
The skirt is paired with a loose, sheer black open-knit sweater trimmed with deep red thread. This allows a glimpse of a simple black bralette worn underneath. This outfit combines punk elements with classic holiday texture. Tall, black over-the-knee boots extend the leg line. Finish with chain accessories and dark makeup.
DIY Instructions: Combining Hard and Soft Textures
This rebellious style mixes tough vinyl with soft knit, so attention to balance is key.
Step 1: The Top Base
Put on a simple black camisole or tank top. This goes under the sweater.
Step 2: The Skirt
Pull on the shiny black pleated mini skirt. Fasten the buckle belt around your waist tightly. Make sure the safety pins and metal loops on the front are sitting straight.
Step 3: The Sweater
Pull the loose, net-like sweater over your head. The red thread details should sit nicely on your arms and neckline.
Step 4: The Boots
Sit down and carefully pull on the tall black over-the-knee boots. They should reach high up your thighs, right up to the bottom of the mini skirt.
Step 5: The Chains
Put on a chunky silver chain necklace. Grab a small black bag that also has a silver chain strap. This look is fierce!
39. The Tartan Riding Poncho

This wonderfully cozy tartan poncho is a statement piece for cold weather. The rich plaid pattern, woven in deep reds and dark greens, feels festive and traditionally rustic. The unique shawl shape features a high, buttoned neck and is trimmed neatly with black leather piping.
A thick leather toggle and asymmetrical zip detail fasten the cape beautifully. This generous cape provides ample warmth and volume. It is styled with black leather leggings and tall rich brown riding boots. Finish the look with a wide-brimmed felt hat and a matching leather backpack for an equestrian-inspired holiday style.
DIY Instructions: Wearing the Voluminous Cape
This piece is large and thick, so we need to put it on correctly so it drapes well.
Step 1: The Bottoms
Put on black leather leggings or skinny pants. They should be tight and smooth.
Step 2: The Boots
Pull on the tall brown boots. They should reach below your knee. Smooth the leggings into the top of the boots.
Step 3: The Poncho
Drape the large tartan poncho over your head and shoulders. Make sure the high collar is centered around your neck. Fasten the leather toggle loop at the front.
Step 4: The Hat
Put on the wide-brimmed hat. Pull it down so it sits securely on your head.
Step 5: The Bag
Put the brown leather backpack on your shoulders. Give the bottom points of the poncho a gentle shake to help the fabric fall neatly. You are now ready for a cool countryside outing!
40. The Iridescent Winter Expedition Parka

This truly exceptional long winter parka is designed for the coldest extremes while looking absolutely sensational. The unique iridescent outer shell shimmers with blue, purple, and green tones, changing color in the light. This provides excellent visibility and high fashion impact.
The parka is lined with thick, cozy sherpa fleece and features a large, dramatic fur-trimmed hood. Drawstrings at the waist allow you to tailor the shape, defining the figure even in deep layers. This ultimate winter coat is worn over a high-neck fleece top and leggings. Finished with a thick knit balaclava and goggles, this look is ready for any severe cold-weather challenge.
DIY Instructions: Layering for Extreme Cold
This look involves many layers, so we must put them on in the correct order to trap the heat.
Step 1: The Inner Layers
Put on warm base layers (leggings and a long-sleeve fleece top). This is what goes directly under the coat.
Step 2: The Coat
Put on the long iridescent coat. Pull the main zipper up all the way. Pull the drawstrings on the inside of the coat at your waist and tie them to make the coat fit tighter around your middle.
Step 3: Neck and Head Warmth
Pull the gray knitted balaclava (the hat that covers your whole neck and head) over your head. Now, pull the large fur-trimmed hood of the coat up over the balaclava.
Step 4: Gloves and Goggles
Put on thick gloves or mittens. They should be very warm. Finally, put the ski goggles over your eyes and pull the strap around the back of your head, over the hood.
Step 5: Adventure Ready
You are completely covered, insulated, and look futuristic! You can face the coldest weather now.
We have explored 40 different outfits suitable for every occasion and temperature a holiday season might bring. The key takeaway is simple: versatility is your greatest asset. A strategic wardrobe means that you can easily pivot from relaxed cozy wear to polished formal style.
By focusing on quality foundational pieces and understanding how to layer and accessorize, you unlock maximum wardrobe potential. These styles confirm that being ready for anything does not require a massive suitcase. It simply requires smart choices.
Key Takeaways
Master the Multi-Occasion Look: Always seek out garments that can be dressed up or down with just a change of shoes or jewelry. This flexibility is what separates a good holiday piece from a truly great one.
Embrace the Contrast: Pairing a soft texture with a hard one—like a chunky knit sweater with sharp leather trousers, or a tailored blazer over athletic shorts—creates visual interest and modernizes any look instantly.
Do Not Fear the Statement: While simplicity is powerful, the holidays are the best time to incorporate a bold piece. Use dramatic elements like feather trims, metallic fabrics, or striking color blocks to make a lasting impression.
DIY Instruction is Essential: Knowing how to quickly and correctly style an outfit is the final step in achieving confidence. Follow the DIY guides to ensure every ensemble is put together flawlessly.