The fashion industry, with its endless cycle of “must-have” items and constantly dropping new collections, is often seen as being at odds with environmental responsibility. This model of “fast fashion” creates a significant strain on our planet, from water pollution to excessive waste in landfills.

But the good news is, a revolution is underway. More people are waking up to the true cost of their clothing choices and demanding a better way.
This shift toward sustainable fashion isn’t about giving up style; it’s about making smarter, more conscious decisions that benefit both your wardrobe and the world. It’s a movement built on longevity, ethics, and mindful consumption.
In this guide, we’ll explore what sustainable fashion really means and break down practical ways you can transition to an ethical wardrobe. Get ready to discover how powerful your purchasing choices can be.
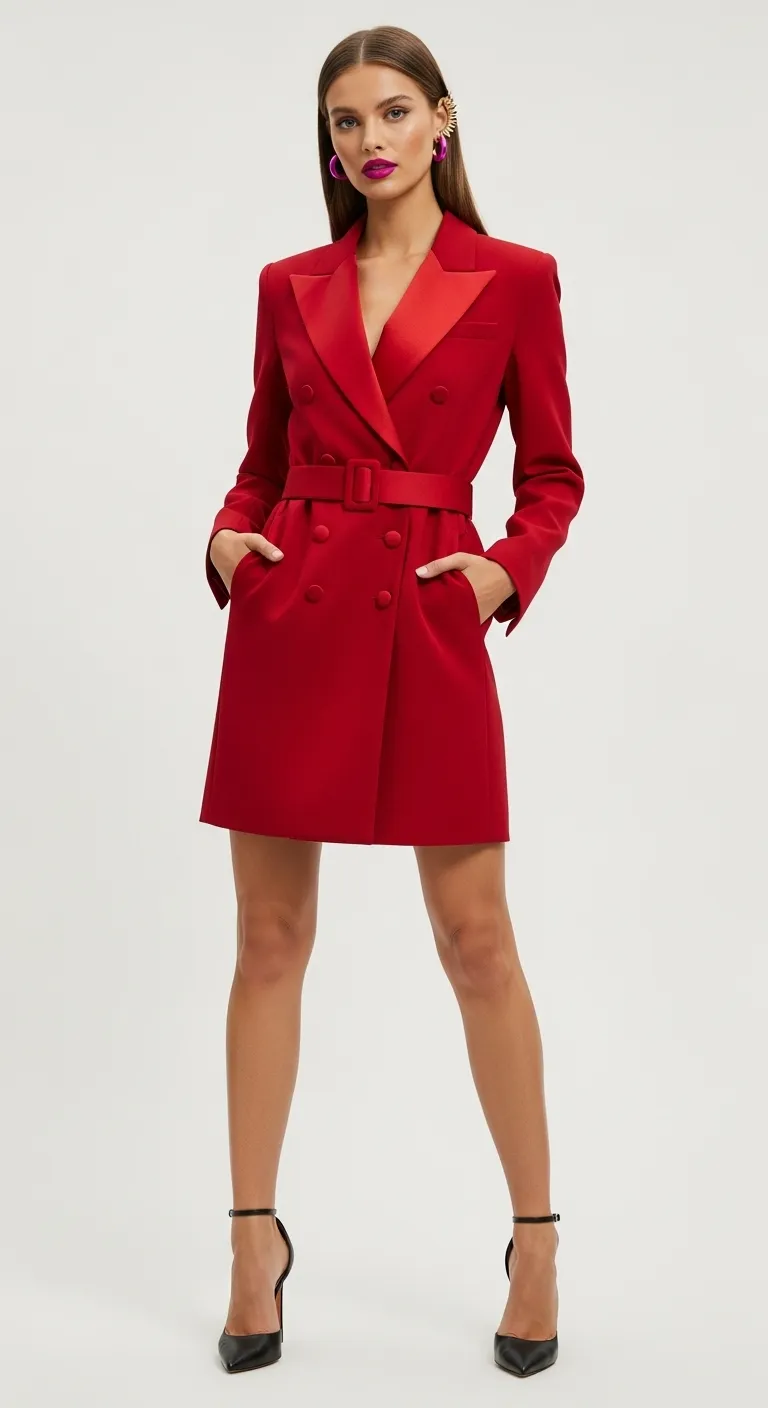
1. The Power Blazer Mini Dress

This look is a fierce, modern twist on holiday elegance, combining a short hemline with structured, tailored suiting. The bold, clean red color feels confident and attention-grabbing. It features broad lapels and a double-breasted closure, giving it a smart, commanding presence. A wide, matching fabric belt cinches the waist beautifully, creating a flattering hourglass shape. Worn with sharp black heels, this is an amazing choice for women who favor a strong, chic aesthetic over traditional gowns. It is a fantastic option for cocktails or an upscale work event.
DIY Style Instructions: Faking a Blazer Dress
You can easily get this sophisticated look by turning a long blazer or jacket into a dress with a strong belt.
What You Need:
- A long, fitted red blazer or suit jacket (must be long enough to cover your backside)
- A thick belt in the same color (or black)
- Safety pins (ask a grown-up for help!)
- Fitted shorts or bike shorts (in black or red)
The Steps (Made Simple):
- Put on the Shorts: Put on your fitted shorts first. This is very important for coverage!
- Wear the Blazer: Put on the blazer or jacket. Button it up completely. It should hang down to your mid-thigh.
- Tuck and Smooth: Gently tug on the blazer to make sure it lays flat and straight. You want the V-neck opening to look clean and neat.
- Add the Belt: Take the thick belt. Wrap it around the narrowest part of your waist, right over the buttoned jacket. Cinch the belt tightly to give the jacket a lovely, tailored shape.
- Secure the Overlap: If the blazer opens slightly when you move, have a grown-up hide a safety pin inside the fabric where the two sides overlap. This keeps the lines clean.
- Find the Shoes: Put on sharp black heels or boots. You now have a stylish, confident blazer dress!
2. The Embroidered Garden Midi

This beautiful midi dress is a captivating blend of classic tailoring and whimsical detail. The stunning red silk fabric has a subtle woven texture. It features a boat neckline and long, elegant sleeves. The dress itself maintains a very classic, slightly flared A-line silhouette. The true magic lies in the three-dimensional, colorful floral appliqués. These fabric flowers in soft yellow and blue cascade over the neckline, shoulders, and down the skirt. This is a wonderfully sophisticated look for a winter wedding or a formal holiday dinner. The light colors of the flowers keep the heavy red from feeling too dark.
DIY Style Instructions: Adding 3D Fabric Flowers
You can transform a simple dress into this artistic, textured piece by adding your own fabric flowers.
What You Need:
- A simple red dress (an A-line shape is lovely)
- Ready-made fabric flowers in light colors (blue, yellow, white)
- Fabric glue (ask a grown-up for help!)
- Small safety pins
The Steps (Made Simple):
- Lay Out the Dress: Place your dress flat on a table so the front is facing up and smooth.
- Plan the Flowers: Look at the picture and plan where you want the flowers to go. You want some around the collar, a few on the sleeves, and some scattered down the skirt.
- Cluster Them: Do not spread the flowers evenly. You want them to look like little “clusters” or bunches, just as they would grow in a garden.
- Glue the First Bunch: Ask a grown-up to help you put a small dab of fabric glue on the back of the flowers and press them firmly onto the fabric.
- Use Pins for Security: For the larger flowers or ones on the shoulders, you can use a small, hidden safety pin right through the center of the flower into the dress fabric, just to make sure they do not fall off.
- Wait for Dry Time: Let the glue dry completely. Now your simple red dress has a beautiful, colorful garden growing on it!
3. The Convertible Tulle Gown

This magnificent garment provides two stunning looks in one: a fun, short party dress and a dramatic, floor-sweeping gown. The base is a simple, fitted red mini dress with short sleeves and a neat, elegant boat neck. It is a completely charming dress on its own. The spectacular drama comes from the addition of a floor-length tulle overskirt. This voluminous red skirt features a lining in bright pink, giving the piece amazing depth and a flash of color as you walk. This piece is fantastic for a hostess who wants to start the evening elegant and switch to something easier for dancing later.
DIY Style Instructions: Making a Dramatic Detachable Overskirt
You can turn any short dress into a huge gown by making a temporary overskirt using tulle or lightweight fabric.
What You Need:
- A simple short red dress
- A large, long piece of red tulle or sheer fabric (ask a grown-up to help you hem the bottom)
- A thick ribbon or thin belt
- Safety pins (ask a grown-up for help!)
The Steps (Made Simple):
- Gather the Skirt: Take the long piece of red tulle. Have a grown-up help you use a thick needle and thread to quickly sew a running stitch (a simple line of stitches) all along the top edge of the tulle.
- Pull the Thread: Gently pull the thread tightly. This will make the long tulle fabric scrunch up and gather. Tie the thread off so it stays gathered.
- Pin the Skirt: Wrap the gathered tulle around your waist (right over your short dress). Have a grown-up use safety pins to secure the gathered tulle to the back waistband of your dress.
- Add the Belt: Put the thick ribbon or belt right over the gathered tulle at your waist. This hides the pins and makes it look like one dress.
- Remove for Dancing: When you are ready to dance, simply unbuckle the belt and unpin the overskirt. You instantly have your short party dress back!
4. The Victorian Brocade Bustle

This look is a historical fashion fantasy, embracing the dramatic shapes and rich fabrics of the Victorian era. The gown is a deep, luxurious brocade fabric in a rich crimson. It features a high collar and long sleeves with structural tailoring on the jacket. The skirt is immense, featuring layers of gathered, ruched fabric and a full bustle effect in the back. The outfit’s unique feature is the external cage structure on the lower part of the skirt, adding an industrial, steampunk edge. This is a marvelous piece for a themed costume party or a highly dramatic entrance at a theatrical event.
DIY Style Instructions: Faking a Ruched Bustle
You can create the dramatic, gathered “ruched” look of this dress using safety pins and a little patience.
What You Need:
- A long, full skirt or dress made of a heavy red fabric
- Black lace trim or thin black ribbon
- Safety pins (ask a grown-up for help!)
The Steps (Made Simple):
- Put on the Dress: Put on your long red dress.
- Find the Ruche Spot: Look in the mirror. Decide where you want the fabric to gather (like on the hips and the bottom of the skirt).
- Start the Gather: Gently pinch the fabric of the skirt in the spot where you want a gather to start. Use a safety pin to secure the fabric to itself, just enough to make it pull up slightly.
- Create the Drapes: Pinch the fabric again a few inches below the first pin, and pin it again. Do this three or four times to create a lovely, ruched drape of fabric.
- Add the Trim: Once the folds are secured, take the thin black ribbon. Have a grown-up carefully use tiny pins or dots of glue to attach the black ribbon right along the line of the gathered folds. This defines the shape.
- Admire the Shape: The fabric is now gathered and draped, giving your skirt a fancy, old-fashioned look.
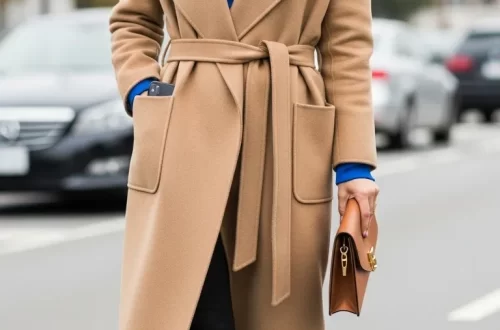
5. The High-Impact Trench Coat

While not a dress, this red trench coat is a wonderful piece that provides structure and drama over any holiday outfit. The crisp red fabric and double-breasted buttons give it a classic, clean silhouette. It has traditional trench coat details, including wide lapels and sleeve straps. The removable bottom panel is secured with a zipper, allowing you to wear it short or long. The standout feature is the wide, two-toned belt cinching the waist. The belt’s unexpected width and color blocking make the whole garment look incredibly high-fashion. This coat is an absolute must-have for making a chic exit or entrance in chilly weather.
DIY Style Instructions: Mastering the Statement Belt
You can give a plain coat an amazing new look by creating a wide, high-contrast belt from two different ribbons.
What You Need:
- A simple red coat or jacket
- Two wide, long ribbons or fabric strips (one black, one tan or light color)
- Fabric glue (ask a grown-up for help!)
The Steps (Made Simple):
- Glue the Ribbons: Have a grown-up help you glue the tan ribbon right on top of the black ribbon. The goal is to make a single, very wide belt with a thin black border all around the tan center. Let it dry completely.
- Put on the Coat: Put on your red coat and leave it open.
- Find the Waist: Locate the narrowest part of your waist.
- Wrap the Belt: Wrap your new, wide two-toned belt around that spot.
- Cinch Snugly: Pull the belt through the buckle (or tie it if it is a scarf) and secure it tightly. You want the coat to be cinched in the middle.
- Style the Flap: If you used a scarf or ribbon, let the ends hang down long in the front. The strong belt color against the red coat creates a totally striking look!
6. The Hollywood Siren Velvet Gown

This stunning velvet gown is pure, old-school movie star glamour. The fabric is a plush, deep red velvet, which is incredibly rich and tactile for the winter season. The silhouette is a dramatic mermaid cut, fitted tightly through the body and flaring out dramatically at the knee. The bodice features a sweetheart neckline accented with crystals and structured cap sleeves, drawing attention to the shoulders. Paired with long, elegant black gloves and shimmering diamond earrings, this outfit is reserved for the most formal, magnificent black-tie affairs. The rich texture is perfect for a truly festive atmosphere.
DIY Style Instructions: Faking a Mermaid Hem
You can make a simple fitted dress look like it has a dramatic mermaid flare by adding ruffles or a layer of stiff fabric at the bottom.
What You Need:
- A simple, fitted long red dress (or fitted long skirt and top)
- A thick, stiff piece of red tulle or stiff fabric (about 12 inches wide)
- Safety pins (ask a grown-up for help!)
- Long black gloves
The Steps (Made Simple):
- Put on the Dress: Put on your long, fitted red dress.
- Find the Flare Spot: Stand in front of the mirror and find the spot right above your knees. This is where the dress will “flare” out.
- Wrap the Stiffener: Take the stiff tulle or fabric. Have a grown-up help you wrap it around the bottom hem of the dress, right where the dress ends. You want the fabric to stick out.
- Pin the Flare: Use safety pins to secure the top edge of the stiff fabric to the inside of the dress hem. This makes the bottom of the dress stick out a little more dramatically.
- Add the Gloves: Put on the long black gloves. Pull them up past your elbows.
- Strike a Pose: The gloves and the slightly flared hem make the whole look feel truly elegant and dramatic!
7. The Bohemian Embroidered Maxi

This free-spirited maxi dress provides a wonderfully comfortable yet colorful option for relaxed holiday gatherings. The earthy, muted red fabric feels soft and flowy. The dress features a long, tiered skirt that creates a gentle, voluminous silhouette. The neckline has a soft drawstring closure. Charming yellow and white embroidery accents the long, billowing sleeves, adding a lovely handcrafted detail. Layering the look with multiple long necklaces and a wide-brimmed felt hat elevates the outfit. This is an excellent choice for a casual, comfortable holiday where you want to feel relaxed and still look lovely.
DIY Style Instructions: The Cozy-Boho Layer
This style is all about layering multiple soft pieces of jewelry and adding one statement accessory, like a hat.
What You Need:
- A long, flowy dress (any earthy color like rust or burgundy)
- Three different necklaces (they should all be different lengths)
- A wide-brimmed hat (felt or straw)
- Multiple bracelets (wood or metal bangles)
The Steps (Made Simple):
- Put on the Dress: Put on your long, comfortable dress.
- Add the Bangles: Put on all your bracelets. Stack them up high on your arms.
- Layer the Necklaces: Put on your three necklaces, making sure the longest one hangs down to your waist. The shortest one should sit right under your chin.
- Add the Hat: Put the wide-brimmed hat neatly on your head. You can tilt it slightly to one side for a charming look.
- Feel the Flow: Gently hold the skirt of the dress in your hands and walk around. The soft fabric and all the accessories should make you feel relaxed and stylish.
8. The Statement Puffer Duster

This remarkable puffer coat is a wonderfully fun and theatrical way to stay warm during the chilliest holidays. The jacket is immensely oversized and padded, creating a strong, almost playful silhouette. The bold, classic red color makes a festive statement even on the coldest winter day. A bright pink lining at the collar and front adds a lovely pop of contrast. The drawstring waist lets you cinch the coat for shape, or leave it loose for maximum coziness. Worn with heels, this coat proves that outerwear can be the most glamorous part of the outfit.
DIY Style Instructions: Faking an Oversized Puffer
You can create a temporary “puffer” effect using thick fleece or batting material under a simple, oversized coat.
What You Need:
- A simple, long, brightly colored coat (red works best)
- Two pieces of thick, soft fleece or quilt batting
- Safety pins (ask a grown-up for help!)
The Steps (Made Simple):
- Prep the Padding: Have a grown-up cut the fleece or batting into long, curved pieces that can fit inside your coat sleeves and torso area.
- Put on the Coat: Put on your long coat.
- Slide the Padding: Gently slide the padded pieces between the coat fabric and your body (if the coat is very loose). If the coat is tighter, put the padding inside the coat lining and use safety pins to hold it in place.
- Create the Puff: The extra padding should make the coat puff out and look much thicker and bigger.
- Add Contrast: To get the pink collar look, pin a piece of pink ribbon around the inside of your coat collar so that only the pink shows at the very top.
- Ready for Winter: The coat should look comically large and incredibly warm, just like the picture!
9. The Opulent Cowl-Neck Velvet Dress

This luxurious midi dress is made from a rich velvet fabric in a deep, patterned burgundy. The texture features an intricate baroque pattern woven into the fabric itself, adding immense visual depth and opulence. The neckline is a soft, draped cowl, which sits beautifully on the collarbone without being too revealing. The three-quarter sleeves are elegant and practical. Paired with a simple, long gold necklace and a small black shoulder bag, this outfit is effortlessly rich and graceful. It is a stunning choice for a sophisticated holiday dinner or a formal theater outing.
DIY Style Instructions: Creating a Cowl-Neck Drape
A cowl neck is a soft, draped neckline. You can turn a regular V-neck into a cowl neck using a safety pin and a brooch.
What You Need:
- A simple, soft V-neck dress or top
- A very thin ribbon or piece of chain
- A decorative pin or brooch
- Safety pins (ask a grown-up for help!)
The Steps (Made Simple):
- Put on the Dress: Put on your soft dress or top.
- Pinch the Fabric: Find the fabric on the V-neck right at your shoulder. Gently pinch a little bit of the fabric from the shoulder seam and fold it inward toward your neck.
- Secure the Drape: Have a grown-up use a safety pin to hold that pinched fabric firmly to the inside of the shoulder seam. Do the same on the other side.
- Check the Drape: When you look in the mirror, the V-neck should now look loose and slightly draped, like a gentle wave, instead of sharp. This is your cowl effect.
- Add the Pin: Place the decorative brooch or pin right near the shoulder where you pinned the fabric. This covers the safety pin.
- Add the Chain: Put on the long necklace or thin chain. The soft neckline looks beautiful with layered jewelry.
10. The Red & White Halter Set

This bright, glamorous look combines high contrast with modern structure. The top is a sleek, fitted red halter bodysuit in a punchy shade. The high neckline is elegant and draws attention to the shoulders. This top is paired with a dramatic, flowing white midi skirt. The skirt is entirely pleated, creating amazing movement and texture. The clean, contrasting colors of red and white feel fresh and festive. Accessorized with long, opera-length white gloves and a metallic clutch, this ensemble is wonderfully dramatic. It is a striking choice for a New Year’s Eve party or a bright, celebratory formal lunch.
DIY Style Instructions: Pleating with an Iron
You can create temporary pleats in a simple skirt by folding the fabric and pressing it carefully with an iron.
What You Need:
- A simple white or light-colored skirt (lightweight fabric is best)
- A simple red top or t-shirt
- An iron and ironing board (ask a grown-up for help!)
- A thin white scarf or ribbon
The Steps (Made Simple):
- Lay Out the Skirt: Lay the skirt flat on the ironing board.
- Create the Folds: Take a section of the skirt fabric and fold it over about half an inch. Then fold it back in the opposite direction, like an accordion or a paper fan. Keep making folds across the whole skirt.
- Iron the Pleats: Have a grown-up carefully press the iron down firmly onto the folded fabric. The heat helps the folds stay in place, creating the pleats.
- Let it Cool: Carefully remove the iron and let the pleats cool before unfolding the skirt.
- Make the Halter Neck: Put on your red top. Take the thin white scarf and tie it in a simple knot behind your neck. Let the ends hang down your back, creating the halter-neck look.
- Style with Confidence: Put on the pleated skirt and the top. The clean, white lines of the skirt look great with the bold red top!
11. The Embroidered Tassel Tunic

This beautiful look celebrates a relaxed, global-inspired style, while keeping the festive red color prominent. The tunic shape offers supreme comfort and a breezy fit, proving that holiday glamour doesn’t need to be tight or constricting. Intricate black, white, and red embroidery accents the neckline and the flared sleeves. Tassels hanging from the V-neck and sleeve hems add playful movement and a handcrafted touch. Paired with comfortable matching red trousers, this outfit is wonderful for family lunches or relaxed gatherings where you might be sitting or moving around a lot. The casual silhouette and layered bracelets give this ensemble a relaxed yet polished feel. It’s an easy, bright way to embrace the festive spirit without wearing a heavy gown.
DIY Style Instructions: Adding Easy Tassels and Trim
You can quickly add this fun, bohemian trim and tassels to any plain top or dress you own!
What You Need:
- A simple red top or short dress
- Decorative ribbon or trim (look for black and white patterns)
- Small yarn tassels (white or black)
- Fabric glue (ask a grown-up for help!)
The Steps (Made Simple):
- Lay Out the Top: Place your red top flat on a table so the front is visible and smooth.
- Cut the Trim: Measure and cut the patterned ribbon. You need pieces for the neckline, the bottom hem of the shirt, and around the cuffs of the sleeves.
- Attach the Ribbon: Ask a grown-up to help you apply a thin, careful line of fabric glue to the back of the ribbon. Press the ribbon firmly onto the edges of your shirt where you planned.
- Wait for Dry Time: You must let the glue dry completely so the trim stays in place.
- Place the Tassels: Once the ribbon is secure, turn the top over and look at the bottom hem and neckline. Use tiny dabs of glue to stick the yarn tassels right along the underside of the ribbon at even spaces.
- Style with Pants: Put the top on over red pants or leggings. The tassels should hang down and swing when you move!
12. The Futuristic Harness Mini

For the woman who loves modern structure and a strong edge, this bold mini dress is an exhilarating choice. The dress itself is a smooth, vibrant red material, creating a second-skin fit with a high neck and long sleeves. This piece features cut-out panels overlaid with black geometric lines, adding visual texture. The statement element is the shiny black patent leather harness wrapped over the bodice. This harness adds an intense, structural look, reminiscent of futuristic armor. Worn with tall black boots, this outfit conveys confidence and a contemporary sensibility. It is a fantastic option for cutting-edge events or holiday parties where a traditional dress would feel far too safe.
DIY Style Instructions: Making a Stylish Harness Belt
You can transform a plain dress into a bold, structured outfit by making a temporary harness look using ribbons or straps.
What You Need:
- A simple red, fitted dress
- Black ribbon or fabric straps (about 1 inch wide)
- Heavy-duty tape or safety pins (ask a grown-up for help with the pins!)
The Steps (Made Simple):
- Put on the Dress: Put on your simple red dress first.
- Measure the Waist: Take one piece of black ribbon and wrap it tightly around your waist, right where you want the harness belt to sit. Secure it in the back with a piece of tape or a safety pin.
- Make the Shoulders: Take two more pieces of ribbon. Attach the end of one ribbon to the front of your waist belt (on your chest) using a safety pin.
- Loop Over the Shoulder: Bring that ribbon up, over your shoulder, and pin the other end to the back of your waist belt. Do the exact same thing with the second ribbon on the other side. You should now have two shoulder straps.
- Add the Chest Piece: Take a final, short piece of ribbon. Pin it horizontally across your chest, connecting the two shoulder straps together in the front.
- Check for Symmetry: Stand in front of a mirror and check that the black lines look straight and even. You now have a fun, temporary harness look!
13. The Satin Cowl-Neck Slip Dress

Embodying effortless sophistication, this vibrant red slip dress is made from luxurious satin, which drapes beautifully over the body. The color is a classic, fiery red that feels immediately festive and celebratory. Thin spaghetti straps and a soft cowl neckline give the dress a delicate, feminine structure. The length is a beautiful maxi, hitting right at the ankle, providing a long, lean silhouette. Layering it with a neutral trench coat over the shoulders adds a casual-chic element, making the look functional for chilly weather. This dress is a gorgeous foundation piece; you can dress it up with heels for a formal event or pair it with simple sandals for a warmer climate celebration. It proves less can truly be more.
DIY Style Instructions: The Cozy-Chic Drape
This style is about keeping a silky dress warm and casual by using a cozy coat draped over your shoulders.
What You Need:
- A simple, silky dress (any color works, but red is best!)
- A long, neutral-colored coat or oversized cardigan (tan, beige, or black)
- Simple, dainty necklaces
The Steps (Made Simple):
- Put on the Dress: Put on your silky dress and your shoes.
- Add the Jewelry: Put on several thin, long necklaces. Make sure they all hang down at different lengths for a layered effect.
- Find the Coat: Get your long, oversized coat. Do not put your arms into the sleeves!
- Drape It: Gently lay the coat over your shoulders, pulling it up so the collar sits neatly behind your neck. It should hang over your back and arms like a superhero cape.
- Keep it Loose: The coat should feel loose and easy, not tight. The idea is to have it look like you tossed it on quickly and effortlessly.
- Ready to Go: Now you have the perfect blend of elegant dress and cozy outerwear. Just remember to hold the coat gently if you move too fast!
14. The Ribbed Knit Two-Piece Set

This warm and cozy outfit shows how sophisticated knitwear can be for the holidays. Made from a thick, ribbed yarn in a deep cranberry red, this set includes a long turtleneck sweater and a matching midi skirt. The heavy ribbing provides wonderful texture and a sense of plush luxury. The high-neck sweater offers maximum warmth, making this an amazing choice for cold weather events. Paired with a long coat, this look is completely winter-ready. You can wear this ensemble with sneakers for casual daytime outings or pair it with tall, over-the-knee boots for a more dressed-up look. The gold brooch adds a lovely festive sparkle, showing attention to detail.
DIY Style Instructions: Making a Warm Matching Set
You can create this chic, monochrome look easily by combining two separate pieces of cozy material in the same color.
What You Need:
- A thick, cozy sweater with a high neck (like a turtleneck)
- A knit or thick fabric skirt that is the exact same color as the sweater
- A decorative pin or brooch (gold looks amazing)
The Steps (Made Simple):
- Find the Pieces: Look for a sweater and a skirt that are exactly the same shade of red or burgundy. It is important that they look like they belong together.
- Tuck and Smooth: Put the sweater on. Gently tuck the bottom edge of the sweater into the waistband of the skirt. You only need to tuck in the very end, just enough to hide the waist.
- Make it Look Seamless: Pull the tucked sweater fabric up a little bit so it slightly blouses over the skirt. This hides the line where the two pieces meet, making it look like a single dress.
- Place the Pin: Take your shiny gold pin or brooch. Fasten it onto the shoulder or collar of the sweater. This small piece of jewelry elevates the whole warm outfit.
- Add Warm Shoes: Put on warm boots or clean sneakers. You have a super stylish and cozy winter holiday outfit!
15. The Architectural Cape Coat

For a truly regal appearance, this stunning wool cape coat is a majestic outerwear choice. Made from a rich, burgundy red wool, the cape falls dramatically from the shoulders, creating a powerful, structural silhouette. The high-standing collar adds another layer of drama and elegance. A surprising element of bright royal blue lining underneath the cape adds a fantastic flash of color as you move. This pop of contrast makes the garment unforgettable. Wearing this over a simple dress with tights and flat boots creates a sophisticated, bold look that keeps you warm. It is the perfect choice for making a theatrical entrance at any cold-weather holiday gathering.
DIY Style Instructions: Making a Dramatic Cape Collar
While you might not have a full cape, you can make a simple coat collar look incredibly dramatic using stiff fabric or cardboard.
What You Need:
- A simple red coat
- A piece of stiff cardboard or thick foam (about the size of a ruler)
- A piece of matching red fabric or felt
- Safety pins and glue (ask a grown-up for help!)
The Steps (Made Simple):
- Prep the Collar Stiffener: Have a grown-up help you cut the cardboard or foam into a crescent shape—a long, curved piece.
- Cover the Stiffener: Carefully glue the red fabric all over the stiff cardboard so you cannot see the cardboard anymore. This is your “collar stiffener.”
- Put on the Coat: Put on your simple red coat and zip or button it up.
- Attach the Stiffener: Carefully slide the red fabric-covered stiffener underneath the back of your coat’s collar. The goal is to make the collar stand up very straight and tall behind your neck.
- Pin for Security: Use a few small, well-hidden safety pins to hold the stiffener to the back of the coat fabric.
- Admire the Look: The coat collar should now stand up dramatically, giving you a powerful, regal silhouette just like the picture!
16. The Belted Cashmere Maxi

This sophisticated look is the essence of quiet luxury, featuring a gorgeous, flowing maxi dress made from soft cashmere knit. The deep burgundy color and fine ribbing suggest warmth and expense without needing any sparkle. It has a chic turtleneck and long, streamlined sleeves. A thin belt in a contrasting color (here, a metallic gunmetal gray) cinches the dress at the natural waist. This small detail prevents the long knit from looking baggy and defines the wearer’s figure. This is a beautiful, easy-to-wear dress that offers immense comfort for a long evening of holiday socializing. You can wear it with elegant boots and simple jewelry for a refined, understated ensemble.
DIY Style Instructions: Cinching a Knit Dress
Knit dresses can sometimes look big and shapeless, but a simple belt can give them a beautiful, fitted shape!
What You Need:
- A long, flowing knit dress (burgundy or deep red works well)
- A thin belt (metallic colors like silver or gold are fun)
- Simple, fitted boots
The Steps (Made Simple):
- Put on the Dress: Put on your long knit dress, making sure the neckline and sleeves are smooth.
- Find the Waist: Feel for the narrowest part of your body. This is your natural waist, which might be a little above where your skirt normally sits.
- Wrap the Belt: Take your thin metallic belt and wrap it around that exact spot.
- Cinch Gently: You do not need to pull the belt super tight; just cinch it enough so the fabric is held neatly against your body. The belt should lay flat.
- Adjust the Blouse: Once the belt is on, gently pull the knit fabric just above the belt so it “blouses” or poofs out just a little bit. This makes the outfit look styled and intentional.
- Complete the Look: Put on your boots. The whole outfit now looks tailored and much more elegant!
17. The Beaded Flapper Fringe Dress

Take inspiration from the roaring 1920s with this sensational, heavily beaded dress. The rich, deep red fabric is covered in intricate geometric patterns made from dark green and black beads and sequins. The square neckline and long sleeves maintain an elegant formality. The real showstopper is the tiered fringe skirt, made of long, swaying strands of black beading. With every step, the fringe moves, creating an energetic, dazzling effect. This style is a truly unique choice for an evening party or a New Year’s celebration that calls for dancing. It requires minimal accessorizing; the dress speaks for itself, demanding attention with its sparkle and movement.
DIY Style Instructions: Adding Flapper Fringe
You can turn any simple party dress into a fun, swishy flapper dress by adding simple strips of fringe!
What You Need:
- A simple, midi-length dress (deep red or burgundy)
- Two rows of black or dark-colored fabric fringe trim (buy this at a craft store)
- Fabric glue or a needle and thread (ask a grown-up for all sewing/gluing)
The Steps (Made Simple):
- Lay Out the Dress: Place your dress on a flat surface.
- Mark the First Line: Use a piece of chalk or a light pencil to draw a straight line around the skirt of the dress, right where the dress hits your knee. This is where your first row of fringe will go.
- Attach the First Row: Have a grown-up carefully glue or stitch the first piece of fringe trim right onto the line you drew. Only attach the top band of the fringe; the hanging strands must be free to swing!
- Mark the Second Line: Measure about three inches below the first row of fringe. Draw a second straight line around the dress.
- Attach the Second Row: Glue or stitch the second piece of fringe trim onto this lower line.
- Try the Shake: Once everything is dry and secure, put the dress on. Walk and gently shake your body. The fringe should swing and sway, making a fun dancing movement!
18. The Peplum Suiting Sheath

Here is a look that is polished and ready for the executive boardroom or a serious holiday luncheon. This sheath dress is sharp and tailored, combining bright red with contrasting black panels on the bodice for a streamlined effect. The dress features a pencil skirt cut, which is incredibly flattering. A fitted peplum ruffle sits right at the natural waist, adding a soft, feminine detail that provides shape and texture. Details like the white buttons running down the back add a chic, unexpected touch. Draping a simple black blazer over your shoulders instantly elevates this into a sophisticated power outfit. This is the ultimate ensemble for ladies who need to maintain professionalism while embracing festive color.
DIY Style Instructions: Adding a Temporary Peplum
A peplum is a fancy name for a little ruffle attached at the waist. You can create a temporary peplum to make any fitted dress look more professional and tailored.
What You Need:
- A simple red, fitted sheath dress
- A piece of stiff black or red fabric (like felt or heavy cotton)
- A thick piece of ribbon or a thin belt
- Safety pins (ask a grown-up for help!)
The Steps (Made Simple):
- Cut the Fabric: Have a grown-up cut the stiff fabric into a large, curved strip. It should be shaped like a long, thin smile, long enough to wrap around your waist.
- Gather and Shape: Now, gently fold or gather the straight top edge of that curved strip just a little bit, making the bottom edge ruffle out.
- Attach to the Ribbon: Pin the gathered, straight edge of your fabric onto the thick ribbon or belt.
- Put on the Dress: Put on your simple red dress first.
- Cinch the Peplum: Wrap your new peplum belt around your waist and tie it in the back. Make sure the ruffled fabric sits flat against the dress.
- Add the Jacket: Put on your black blazer, or simply drape it over your shoulders as seen in the picture. The little ruffle at your waist makes the whole outfit look incredibly tailored!
19. The Disco Sparkle Jumpsuit

This outfit guarantees you will be the life of the party! This shimmering, metallic jumpsuit in a deep, cranberry red evokes the fun energy of the disco era. The glittery fabric catches every light, ensuring maximum holiday sparkle. The plunging V-neckline is dramatic, balanced by long, slightly puffed sleeves with fitted cuffs. The legs flare out dramatically at the ankle, adding movement and vintage flair. A matching fabric belt cinches the waist, ensuring a flattering, hourglass shape despite the volume. Paired with chunky platform shoes, this ensemble is the ultimate look for dancing all night at a festive party.
DIY Style Instructions: Adding Disco Sparkle
You can easily add shine and sparkle to any old outfit to make it ready for a disco party!
What You Need:
- A simple jumpsuit or a top and wide-leg pants (any color)
- Sparkly fabric paint or glitter spray (ask a grown-up for help with spray!)
- A wide belt
The Steps (Made Simple):
- Find the Outfit: Choose a top and pants that are the same color and material. A dark red or maroon works best.
- Protect Your Area: Lay down newspapers or a plastic sheet outside, as this step can be messy.
- Add the Sparkle: Have a grown-up help you use the glitter spray or fabric paint. Hold the spray can about one foot away from the clothes and spray lightly all over. You want a shimmer, not a solid coat of paint.
- Wait for Dry Time: Let the paint or spray dry completely outside, which might take several hours.
- Put on the Belt: Once the outfit is dry, put it on and add a wide belt that matches the outfit (like the red belt in the picture). Cinch the belt tightly to give the pants and top a great shape.
- Get Ready to Dance: Now your outfit shimmers and shines under the lights!
20. The Classic Polka Dot Swing Dress

Embrace vintage charm with this adorable and lively red and white polka dot dress. This style is based on the famous swing dresses of the 1950s, featuring a fitted bodice and a wonderfully full, flared skirt. The white polka dots create a playful, festive pattern. A wide, patent leather black belt cinches the waist, creating that iconic hourglass silhouette. The flared skirt is often worn with a petticoat underneath to add maximum volume and movement. Wearing this dress is simply fun and delightful, making it a marvelous choice for an upbeat party or a themed celebration. The classic design ensures you look charming and elegant for any holiday occasion.
DIY Style Instructions: Creating a Full Swing Skirt
This DIY shows you how to make a regular skirt look extra big and bouncy, just like the swing dress in the picture!
What You Need:
- The polka dot dress or a simple dress with a full skirt
- A petticoat or crinoline (a fluffy skirt worn underneath) OR a few layers of simple tulle fabric
- A wide black belt
- Pearl necklace
The Steps (Made Simple):
- Prep the Fullness: If you have a petticoat (a very fluffy underskirt), put it on first. If you are using tulle fabric, gather a few large, wide pieces of tulle and carefully pin them to a piece of elastic to create a fluffy underskirt.
- Put on the Dress: Gently pull your dress on over the fluffy petticoat or tulle. The skirt of the dress should now look much bigger and bouncier than before.
- Cinch the Waist: Put on your wide black belt. Cinch it tightly so your waist looks tiny compared to the big, full skirt.
- Add the Accessories: Put on a simple string of pearls around your neck.
- Style the Hair: Put your hair up neatly and add a small bow if you have one.
- Practice the Spin: Try a little spin! The skirt should swing out dramatically and look fantastic. You are ready for a retro holiday!
21. The Tulle Ruffle High-Low Gown

Prepare for a seriously dramatic entrance with this breathtaking, layered tulle creation. The voluminous skirt, featuring tiers of light red tulle, creates magnificent dimension and movement. The high-low hemline is incredibly chic, allowing you to show off your fantastic metallic shoes. Off-the-shoulder sleeves with large puff details frame the face beautifully, drawing the eye upward. A wide, statement gold belt cinches the waist, offering a powerful, flattering break in the layers of red. This look is pure fantasy, making it the absolute choice for a major gala, wedding reception, or an opulent New Year’s Eve celebration. Accessorized with thick gold cuffs, this ensemble commands attention from every angle.
DIY Style Instructions: Creating Extreme High-Low Drama
You can make a simple, full-skirted dress look incredibly grand by adding layers of lightweight material underneath and creating a temporary dramatic hemline.
What You Need:
- A dress with a full skirt (like a circle skirt or A-line)
- Several pieces of gathered red or pink tulle (ask a grown-up for help gathering them)
- Safety pins (ask a grown-up to help with the pins!)
- A wide, shiny gold scarf or ribbon
The Steps (Made Simple):
- Prep the Under-Layers: Gather your pieces of tulle. You want these to be different lengths so that when you put them on, they stick out from underneath your dress skirt, making it look much fuller.
- Pin the Tulle: Have a grown-up carefully pin the gathered tulle underneath your skirt. Focus the fullness mostly around the back and sides.
- Find the Off-Shoulder Look: Put on your dress. Gently pull the sleeves or neckline down so they sit right on the edge of your shoulders. This creates the off-the-shoulder effect.
- Cinch the Gold Belt: Wrap the wide gold scarf or ribbon tightly around your waist, right over the dress fabric. Tie it neatly in the back. This gold band should sit a little higher than where your waist naturally falls.
- Try the Walk: Take a few steps. The gold belt and the fluffy skirt should make you feel like royalty!
22. The Vintage Shirt Dress

This lovely dress channels the elegance of 1940s fashion, offering a smart, charming option for daytime holiday events. The rich, muted rust-red color feels warm and appropriate for the season without being too loud. This style features a structured collar and a front lined with neat buttons. The mid-calf length and gentle pleats in the skirt give the dress an effortlessly feminine shape. A thin, self-fabric belt cinches the waist, ensuring a flattering, classic silhouette. Finished with a delicate patterned scarf tied around the hair and a simple locket necklace, this ensemble is all about refined detail. This shirt dress is a practical yet totally sophisticated look for family lunches or a special trip to a Christmas market.
DIY Style Instructions: The Polished Vintage Look
You can transform a regular button-down dress into a chic vintage look by paying close attention to accessories and structure.
What You Need:
- A button-down dress or shirt and skirt combination (rust-red color is nice)
- A thin, matching belt
- A small, patterned scarf
- A long necklace with a large pendant
The Steps (Made Simple):
- Button it Up: Put on your dress and button it all the way up to the collar. You want the neckline to look very neat.
- Add the Belt: Put your thin belt right around your natural waistline. Pull it just tight enough to gather the fabric gently.
- Tuck the Scarf: Take the small, patterned scarf and fold it into a thin band. Tie it around your head, either under your chin or in a small knot on the top of your head, like a headband.
- Add the Locket: Put on the long pendant necklace so it hangs down over the buttons of the dress. The jewelry should rest right above your chest.
- Iron Everything: This is the important step! Ask a grown-up to gently iron the collar and the belt so they look super crisp and flat. This makes the whole look polished and vintage.
23. The Modern Crochet Mini Dress

This fun, textured mini dress brings a playful, bohemian edge to holiday dressing. The bright red cotton is intricately crocheted, creating a lovely open pattern that adds depth and interest to the fabric. Worn over a simple slip, the crochet lace is the main feature. The sleeveless design and short length are perfect for warmer holiday parties or layered with stockings for cooler climates. A thick, colorful beaded necklace sits right at the collar, adding another bold splash of color and drawing attention to the neckline. Paired with edgy black tights and colorful rings, this outfit is youthful and artistic. This unique texture ensures you stand out from the crowd without relying on sequins or satin.
DIY Style Instructions: Faking a Crochet Texture
You can give a simple dress the feeling of a knitted or crocheted dress by creating a textured effect over the top.
What You Need:
- A simple red, sleeveless mini dress or top
- A piece of lacy or fishnet material (red, white, or black)
- Safety pins or temporary hemming tape
- A thick, chunky necklace with colored beads
The Steps (Made Simple):
- Put on the Dress: Put on your simple red dress first.
- Layer the Lace: Take the piece of lace or net material and carefully drape it over the outside of your dress.
- Pin the Edges: Have a grown-up help you pull the lace material smooth and pin the edges of the lace to the inside of the dress at the shoulders and the bottom hem. The pins must be hidden inside.
- Keep it Loose: The lace should sit a little loosely over the dress so you can see the red underneath peeking through the holes, just like the crochet pattern.
- Add the Necklace: Put on your thick, chunky beaded necklace. Make sure it sits high up on your neck, just under your chin.
- Style the Legs: Put on a pair of fun, patterned black tights or stockings. The whole look is now cool and textured!
24. The Utility Pocket Midi

Showcasing a unique blend of casual structure and festive color, this midi dress is ready for action. The high-neck, short-sleeved silhouette is simple and comfortable. Its bold, flat red color contrasts beautifully with the olive green accessories. The main design feature is the abundance of military-style pockets on the chest and hips, giving the dress a functional, utility edge. Gold buttons and metal rings add sharp detail and a touch of shine. A wide, webbed green belt cinches the dress tightly, providing an exciting color contrast. This is a marvelous look for a relaxed outdoor holiday activity or a casual party where you want to be comfortable yet completely unique.
DIY Style Instructions: Adding Easy Utility Pockets
You can instantly transform a basic dress into a structured utility style by adding fake pockets and a colorful belt.
What You Need:
- A simple red dress with a high neckline
- Two small pieces of matching red felt or fabric for fake pockets
- Small gold buttons or shiny coins
- A wide, webbed green belt (or any contrasting color)
- Fabric glue (ask a grown-up for help!)
The Steps (Made Simple):
- Put on the Dress: Put on your simple red dress.
- Place the Pockets: Take the two small pieces of red felt. Decide where you want them to sit on your chest (one on each side).
- Glue the Pockets: Have a grown-up glue three sides of the felt piece onto the dress, leaving the top side open like a real pocket. Repeat for the second piece.
- Add the Buttons: Glue a small gold button or shiny coin onto the center of the flap of each new pocket.
- Cinch the Belt: Put your wide green belt on right over your waist. Cinch it tightly. Let the end of the belt hang down long, just like the picture.
- Complete the Look: You can even tuck a small piece of colored handkerchief into one of the top pockets for extra detail!
25. The Sheer Lace High-Low Gown

Romance and drama come together in this spectacular red lace gown. The dress is constructed entirely of intricate floral lace, giving it a delicate, layered look. A shorter lining underneath creates a sheer effect through the skirt, showing off the legs in a tasteful way. The deep red is accented by subtle navy blue details at the waist and on the cuffs, which is a surprisingly elegant color combination. The high neckline and long sleeves maintain a sophisticated structure. With its sweeping high-low hem and sheer detailing, this is a beautiful choice for a formal reception or an event where you want to feel both feminine and modern. Paired with a dark clutch, this outfit truly captivates.
DIY Style Instructions: Layering for a Sheer Lace Look
You can create the effect of wearing a sheer lace overlay by carefully layering a lace scarf over a simple fitted dress.
What You Need:
- A simple red, long-sleeved dress that hits just above the knee (this is the lining)
- A large, thin lace shawl or scarf (must be red or a dark color)
- A thin blue or black ribbon
- Safety pins (ask a grown-up for help!)
The Steps (Made Simple):
- Put on the Dress: Put on your simple red dress first.
- Drape the Lace: Drape the large lace shawl over your entire body, covering the dress.
- Create the High-Low: Have a grown-up help you adjust the shawl. Pull the lace up a little in the front so your knees show through the lace. Let the lace hang down low in the back to create a train.
- Pin the Lace: Carefully pin the lace shawl to the shoulder seams of your dress so it stays put. The pins must be small and hidden.
- Cinch the Waist: Take the thin blue or black ribbon and tie it tightly around your waist, right over the lace. The blue ribbon acts as a sharp, structural belt.
- Check the Edges: Make sure the lace hangs nicely around the edges of the sleeves. You now have a sheer, textured gown!
26. The Black Tulle Mini-Peplum Gown

While technically black, this gown is included to show how dark, plush velvet acts as a backdrop for the festive red family. The velvet fabric is rich and hugs the figure, creating a long, streamlined silhouette. The high neckline is framed by sheer mesh detailing and a cutout at the collarbone. The dramatic detail is the structured mini-peplum, a puff of black tulle positioned right above the knee. This architectural feature adds an unexpected, almost gothic flair to the shape. Paired with intense makeup and sharp accessories, this look is wonderfully rebellious and dramatic. This ensemble is a strong choice for those who want a dramatic, non-traditional look for a winter evening party.
DIY Style Instructions: Adding a Structured Tulle Puff
This DIY shows you how to use a simple piece of craft material to add a dramatic ruffle or puff to a plain long dress.
What You Need:
- A simple, fitted long black dress
- A piece of pre-gathered black tulle (a little thicker than a ribbon)
- Safety pins (ask a grown-up for help!)
The Steps (Made Simple):
- Put on the Dress: Put on your simple long black dress.
- Find the Peplum Spot: Feel around the bottom of the skirt, right where your knees are. This is where the puff will sit.
- Place the Tulle: Wrap the gathered tulle ribbon around your dress at that knee spot. The tulle should stick out like a little shelf.
- Pin it Securely: Have a grown-up help you use safety pins to fasten the top edge of the tulle ribbon to the dress fabric all the way around. Make sure the pins are only holding the top of the tulle so the bottom can stick out freely.
- Check the Shape: The tulle should sit straight out from the dress, creating a small, stiff ruffle. This gives your plain dress a fancy, architectural shape.
- Walk the Walk: Take a few steps. The little puff should stay put while you move!
27. The Avant-Garde Ruffle Dress

This highly artistic dress takes the concept of ruffles and volume to an extreme, theatrical level. Made from a rich, stiff red fabric, the design features layers of deliberately distressed and frayed ruffles around the neckline and skirt. The raw edges give the garment a deconstructed, contemporary feeling. The skirt is the focal point, gathered into large, dramatic poufs that stick out from the body. This shape creates a truly unforgettable, asymmetrical silhouette. Worn with simple clear heels and thick, modern silver cuffs, this ensemble is pure high fashion. It is an amazing choice for fashion-forward events, art gallery openings, or anywhere you wish to demonstrate a cutting-edge personal style.
DIY Style Instructions: Making Ruffles Poof Out
This DIY is about making a fabric look purposefully messy and dramatic by using simple cardboard or wire.
What You Need:
- A simple red dress with long sleeves
- A lot of thin ribbon or fabric ruffles (in red or pink)
- Stiff wire or thin cardboard (ask a grown-up for help!)
- Safety pins
The Steps (Made Simple):
- Attach Ruffles (Grown-Up Step): Ask a grown-up to sew or glue the ribbon ruffles onto the edges of the shoulders and the hem of your dress.
- Cut the Wire/Cardboard: Have a grown-up cut three pieces of stiff wire or thin cardboard into crescent shapes.
- Make the Skirt Puff: Put the dress on. Take one piece of wire or cardboard and carefully slide it underneath the fabric of the dress skirt, right where you want the fabric to stick out.
- Pin the Structure: Have the grown-up use safety pins to attach the wire or cardboard to the underside of the dress skirt so it is hidden. The dress fabric should now stand out in a large, curved shape.
- Repeat the Puff: Add the other two pieces of wire/cardboard to different spots on the skirt (like the other side and the back).
- Fluff the Ruffles: Gently pull and fluff the ruffles you added to the shoulders and hem. They should look messy, loose, and dramatic!
28. The Geometric Column Gown

Modern art meets timeless elegance in this sleek, floor-length column gown. The brilliant, bold red fabric creates a long, lean silhouette that is utterly sophisticated. The dress features strong, tailored lines and a high, draped neckline. A contrasting white geometric panel on the chest draws the eye upward and adds a graphic, crisp element to the smooth red background. The sleeves are long and fitted, ending in a subtle puff detail at the cuff. This gown is a sophisticated option for the most formal winter events, suggesting a refined, minimal aesthetic. Paired with oversized pearl rings and a dark clutch, the look is understated luxury.
DIY Style Instructions: Adding a Geometric Color Block
You can add a temporary, sharp white color block to a red dress using simple fabric or felt.
What You Need:
- A long, smooth red dress
- A piece of stiff white felt or fabric (at least 6 inches wide)
- Fabric glue or hemming tape (ask a grown-up for help!)
The Steps (Made Simple):
- Put on the Dress: Put on your long red dress.
- Cut the Shape: Have a grown-up cut the white felt into a wide, upside-down triangle or a V-shape. It should be wide enough to cover the center of your chest.
- Place the Shape: Remove the dress and place the white V-shape right on the front of the dress’s chest area. The wide part should sit right across your collarbones.
- Glue it Down: Ask a grown-up to carefully apply a thin line of fabric glue or use hemming tape to attach the edges of the white felt to the red dress.
- Let it Dry: Wait until the white shape is completely secure and the glue is dry.
- Style with Confidence: Put the dress back on. The white shape adds a sharp, clean line to your chest, making the red look even bolder!
29. The Taffeta Bow Midi Dress

Nothing says classic holiday party quite like a magnificent bow! This charming midi dress is made from crisp taffeta, a fabric known for its rich texture and beautiful sheen. The deep cherry-red color feels traditionally festive. The large, structured bow sits perfectly on the waistline, adding immense charm and volume to the bodice. Puff sleeves and a gently flared skirt complete the beautifully feminine silhouette. A thin gold chain belt with a tassel adds a delicate sparkle, contrasting with the bold bow. Paired with emerald green accessories, this outfit perfectly captures the classic Christmas color palette in a glamorous way.
DIY Style Instructions: Creating a Giant Waist Bow
You can create a spectacular bow and attach it temporarily to a dress to get this huge, dramatic effect!
What You Need:
- A dress with a nice, full skirt
- A large piece of stiff red fabric (taffeta or felt works well)
- A thin gold chain or ribbon
- Safety pins and thread (ask a grown-up for help!)
The Steps (Made Simple):
- Make the Bow (Grown-Up Step): Have a grown-up carefully fold the large red fabric piece into a big, stiff bow shape. Use thread to sew the center of the bow together so it holds its shape.
- Pin the Bow: Put on your dress. Have a grown-up use large safety pins to attach the back of the bow right onto the front of your waist. The bow must sit perfectly flat.
- Wrap the Gold Chain: Take the thin gold chain or ribbon and wrap it once around your waist, just above the bow.
- Let it Dangle: Let the end of the chain hang down to the side, giving it a playful, sparkly dangle.
- Add Green Accessories: Find a green clutch or green shoes. These pieces, paired with the red dress, create that classic, beautiful holiday color combination!
30. The Ostrich Feather Mini

For an outfit that is completely joyful and flamboyant, look no further than this fun mini dress trimmed with soft, dramatic feathers. The dress is made from a smooth, satin-like red fabric with a slight sheen. The hemline has an asymmetrical cut, adding a modern, playful edge. Thick red ostrich feathers line the cuffs and the bottom hem, creating fantastic texture and movement with every step. The collar and cuffs are lined in a soft pink, which is a lovely, subtle accent color. This is a youthful, energetic outfit that is perfect for celebrating New Year’s or a high-energy dance party. It is a stylish way to embrace softness and extreme texture in your holiday wardrobe.
DIY Style Instructions: Adding Fluffy Feather Trim
You can easily get this fluffy, textural look by adding ready-made feather trim to the edges of a simple dress or cuffs.
What You Need:
- A simple, short-sleeved red dress
- Ostrich feather trim (you can buy this in red or pink at a craft store)
- Fabric glue (ask a grown-up for help!)
- Black tights or stockings
The Steps (Made Simple):
- Lay Out the Dress: Lay your dress flat on a table.
- Mark the Trim: Decide where you want the feathers: around the sleeves and along the bottom hemline.
- Glue the Feathers: Have a grown-up carefully glue the top band of the feather trim right onto the edge of the sleeves and the bottom hem of the skirt. You only glue the very top, so the feathers hang down and stick out!
- Wait for Dry Time: You must wait until the glue is completely dry before touching or wearing the dress.
- Try it On: Put on the dress and your black tights. Gently shake your body. The feathers should wiggle and move with you, making the whole outfit feel fun and light!
31. The Power Ruffle Sheath

This dress is the definition of commanding attention, blending sharp, professional tailoring with striking details. The vibrant red sheath dress features an elegant boat neck and pronounced, structured shoulder pads, creating an unmistakable power silhouette. The knee-length pencil skirt includes a tasteful slit. A thick, corset-style black belt cinches the waist tightly, providing incredible shape and a strong visual contrast. A subtle ruffle cascades from the belt down the hip, softening the otherwise severe lines. This ensemble is a fantastic choice for professional holiday parties or corporate events where you need to look polished and utterly confident. Paired with simple black heels and gold earrings, this outfit is pure modern sophistication.
DIY Style Instructions: Adding Power Shoulders and a Cinch Belt
You can give a regular fitted dress a serious structure boost using simple foam pads and a wide belt.
What You Need:
- A simple, fitted dress with long sleeves
- Two small foam shoulder pads (look for these at a craft or fabric store)
- A very wide black belt or a thick, black scarf
- Safety pins (ask a grown-up for help!)
The Steps (Made Simple):
- Put on the Dress: Put on your simple fitted dress.
- Place the Pads: Take one foam shoulder pad and place it right on top of your shoulder, underneath the dress fabric. Place the second pad on the other shoulder.
- Pin the Pads: Have a grown-up carefully use a few safety pins to attach the shoulder pads to the inside of the dress at the top seam. The goal is to make your shoulders look much bigger and sharper.
- Add the Belt: Take the wide black belt or scarf. Wrap it tightly around the narrowest part of your waist, right over the dress.
- Secure the Cinch: Fasten the belt snugly. This strong contrast between the wide belt and the sharp shoulders makes your waist look tiny and powerful.
- Stand Tall: Stand up straight! The new structure in the shoulders helps you look incredibly confident and ready for anything.
32. The Mod Trim Mini

Embrace the playful energy of the 1960s with this crisp, graphic mini dress. The bright red fabric is beautifully accented with sharp, white trim that outlines the shift shape and pockets. This contrast is clean and incredibly eye-catching. The structured white collar is oversized and flat, creating a gorgeous frame for the neck. Large, white circular buttons add to the vintage, mod aesthetic. Worn with a simple black neck ribbon and tall white go-go boots, this outfit is a fun, energetic throwback. It’s a wonderful style for lively, youthful holiday parties or retro-themed gatherings where fun is the main requirement.
DIY Style Instructions: Creating Sharp White Trim
You can easily add this clean, contrasting white trim to any simple, dark-colored dress to make it look mod and sharp.
What You Need:
- A simple red, sleeveless mini dress (a “shift” shape is best)
- White bias tape or white ribbon (at least 1 inch wide)
- Fabric glue or hemming tape (ask a grown-up for help!)
- Large white buttons
The Steps (Made Simple):
- Lay Out the Dress: Place your red dress flat on a table.
- Plan the Lines: Look at the picture and draw light pencil lines where you want the white trim to go (around the collar, the arm holes, the bottom hem, and straight down the front).
- Apply the Trim: Have a grown-up measure and cut the white ribbon. Use a thin line of fabric glue or hemming tape to carefully attach the white ribbon right along your pencil lines. The lines must be very straight and neat!
- Add the Buttons: Once the glue is dry, glue the large white buttons onto the dress where the ribbon pockets start. These are decorations, not working buttons.
- Make the Bow: Take a piece of black ribbon and tie a simple, small bow. Pin the bow right under the collar of the dress.
- Check the Edges: The clean white edges make the red color pop, creating a totally chic, vintage look!
33. The Asymmetrical Zip Dress

For a genuinely dramatic and edgy holiday style, this asymmetrical dress is the perfect fit. It is cleverly designed in a half-and-half style, blending bold red and sharp black panels. This color block is immediately striking. The dress features a statement silver zipper running diagonally down the entire front, which can be adjusted to create a high slit. One side features a single, oversized puff sleeve, while the other side is sleeveless for an unexpected balance. Worn with thick, lace-up combat boots, this ensemble is wonderfully rebellious and cool. This outfit is an exciting choice for artistic or unconventional holiday parties that appreciate strong, unique fashion.
DIY Style Instructions: Creating a Half-and-Half Look
You can create this cool, structured look by pairing a colorful dress with a contrasting top and wrapping a large piece of black fabric around the lower half.
What You Need:
- A simple red top with a voluminous sleeve (or any top with a unique sleeve)
- A piece of stiff black fabric (long enough to go from your waist to your knee)
- A thick belt
- Safety pins (ask a grown-up for help!)
The Steps (Made Simple):
- Put on the Red: Put on the red top.
- Make the Black Skirt: Take the black fabric. Have a grown-up help you wrap it around the lower half of your body, starting at the waist and making sure it covers the front and back of one leg.
- Create the Asymmetry: Pin the black fabric so it hangs lower on one side (like a diagonal line) and shorter on the other. This creates the asymmetrical hemline.
- Add the Zip Look: To fake the zipper look, you can use a line of shiny metallic tape (like silver duct tape) right where the red top meets the black fabric.
- Cinch the Waist: Put on a black belt over the top of the fabric line.
- Style with Boots: Wear chunky black boots. You now have a bold, dramatic, two-toned look!
34. The Tiered Sequin Ballgown

Achieve true fairy-tale magnificence with this breathtaking strapless ballgown. The dress is completely covered in red sequins, making it shimmer and sparkle intensely under the lights. Tiers of gathered fabric create incredible, gravity-defying volume through the skirt. The fitted bodice is structured with silver and light blue accents at the bustier line, adding a gorgeous, icy contrast to the warm red. This corset-like detail offers amazing support and shape. This gown is the ultimate choice for a truly formal, grand occasion like a charity ball or an upscale wedding reception during the holidays. It is a spectacular ensemble that guarantees all eyes will be on you.
DIY Style Instructions: Building a Sequin Skirt
You can create the feeling of a giant, tiered skirt by wearing several full skirts over each other in different shades of red and pink.
What You Need:
- A simple strapless top or fitted bodice (silver or white is nice)
- Three to four full skirts (A-line or circle skirts) in red, pink, and maybe a slightly darker red.
- Plenty of silver glitter or craft sequins
- Fabric glue (ask a grown-up for help!)
The Steps (Made Simple):
- Prep the Skirts: Ask a grown-up to help you sprinkle a light layer of glue and glitter or sequins onto the bottom three inches of each skirt. Let them dry completely!
- Layer the Skirts: Put on the skirts one by one, starting with the longest one first. Each skirt should sit slightly higher on your waist than the last one, so they all show at the bottom.
- Put on the Top: Put on your simple strapless top.
- Add Silver Detail: To get the silver bodice look, wrap a thin silver ribbon or jewelry chain right under your bust line.
- Spin and Sparkle: The skirts should bounce and show off the sparkly edges. The layers create that dramatic, grand ballgown shape!
35. The Velvet Wrap Maxi Dress

Combining cozy texture with feminine tailoring, this gorgeous wrap dress is an elegant choice for any intimate gathering. The lush, rich red velvet fabric catches the light beautifully, giving the maxi dress immense depth and warmth. The true wrap style means the fit is customizable and universally flattering. The dress features a subtle high-low hemline and a deep V-neck, beautifully framed by delicate gold necklaces. A plush, cream-colored faux fur stole draped over the arm adds a lovely, soft winter accent. This is a comfortable yet incredibly luxurious look, making it amazing for a Thanksgiving dinner or a casual Christmas Eve celebration. The tassels on the belt add a final, charming touch of detail.
DIY Style Instructions: Styling the Wrap Dress
A wrap dress is a piece of clothing that you wrap around your body and tie. You can make any simple dress look like a wrap dress by using a belt and a safety pin.
What You Need:
- A simple V-neck maxi dress
- A thin belt or ribbon that matches the dress color
- A fuzzy, creamy white scarf or faux fur piece
- Layered necklaces
The Steps (Made Simple):
- Put on the Dress: Put on your simple V-neck dress.
- Fake the Wrap: Take the loose, extra fabric from one side of the dress front and pull it gently across your body to the other side.
- Pin the Fabric: Have a grown-up carefully use a safety pin to hold that fabric in place at your waistline. This makes the front of the dress overlap like a true wrap dress.
- Add the Belt: Put the belt or ribbon over the safety pin, right at your waistline. Tie it in a neat knot or bow to hide the pin and cinch the waist.
- Style the Fur: Take the fuzzy scarf or fur piece. Gently drape it right over your arm, near your elbow, and hold it there with your hand.
- Enjoy the Softness: The soft velvet look combined with the fluffy fur feels so luxurious and warm!
36. The Tinsel Fringe Midi

End your festive fashion journey with this dazzling, incredibly fun fringe dress! The entire garment is covered in dense, metallic red tinsel-like fringe, creating a spectacular, shimmery texture. The boxy shape and midi length keep the focus entirely on the playful movement and shine. The long sleeves and high neckline ensure the look feels complete and sophisticated despite the bold, shimmery texture. The fringe hangs in dense layers, creating a blinding, fluid effect with every slight movement. Worn with simple black ankle boots and a silver clutch, this outfit is pure celebration. This is the final word in holiday party dressing—perfect for ringing in the New Year with maximum sparkle and fun.
DIY Style Instructions: Making a Tinsel Dress
You can create an awesome, shimmering fringe dress using a simple shift dress and fun, party-ready tinsel trim!
What You Need:
- A simple, boxy dress with long sleeves (red or black)
- Long, wide strips of red metallic tinsel or metallic fringe (look for these in the party section of a store)
- Fabric glue (ask a grown-up for help!)
The Steps (Made Simple):
- Lay Out the Dress: Place your simple dress flat on a large table.
- Start at the Top: Have a grown-up help you measure a strip of tinsel that goes all the way across the dress, just under the neckline.
- Glue the First Strip: Apply a line of fabric glue right under the neckline and press the first strip of tinsel down. The tinsel should hang down over the dress.
- Add More Strips: Measure about two inches down from the first line of tinsel. Glue a second strip there. Continue doing this, adding rows of tinsel every two inches, all the way down the dress and onto the sleeves.
- Be Patient: You must let the glue dry completely before trying the dress on. It might take a long time, but it’s important!
- Walk and Shimmer: Put the dress on and walk toward a bright light. The tinsel will shimmer like crazy, making you look like the most festive person there!
Embracing sustainable fashion is more than just a trend—it’s a fundamental change in how we view and consume clothing. While the scale of the fashion industry’s impact can feel overwhelming, remember that every thoughtful purchase, every repair, and every conscious decision contributes to a larger, positive shift.
You don’t have to overhaul your entire closet overnight. Start small by asking critical questions: Who made this? What is it made of? Will I wear it for years?
By choosing quality over quantity, supporting ethical brands, and giving pre-loved items a new life, you become an active participant in creating a more ethical and less wasteful future for fashion. The most sustainable garment is the one you already own—so wear it proudly, and shop smarter for the next.
Key Takeaways
- Mindful Consumption is Key: The most impactful sustainable choice is simply buying less and making the most of what you already have.
- Prioritize Quality and Longevity: Investing in well-made, classic pieces means fewer replacements and less waste over time.
- The Power of Pre-Loved: Embrace thrifting, swapping, and reselling as powerful alternatives to buying new, significantly reducing your environmental footprint.
- Read the Labels: Look for brands committed to ethical labor practices and materials like organic cotton, linen, Tencel, or recycled fibers.
- Repair and Repurpose: Extend the life of your clothes through simple maintenance, repairs, and creative upcycling projects.